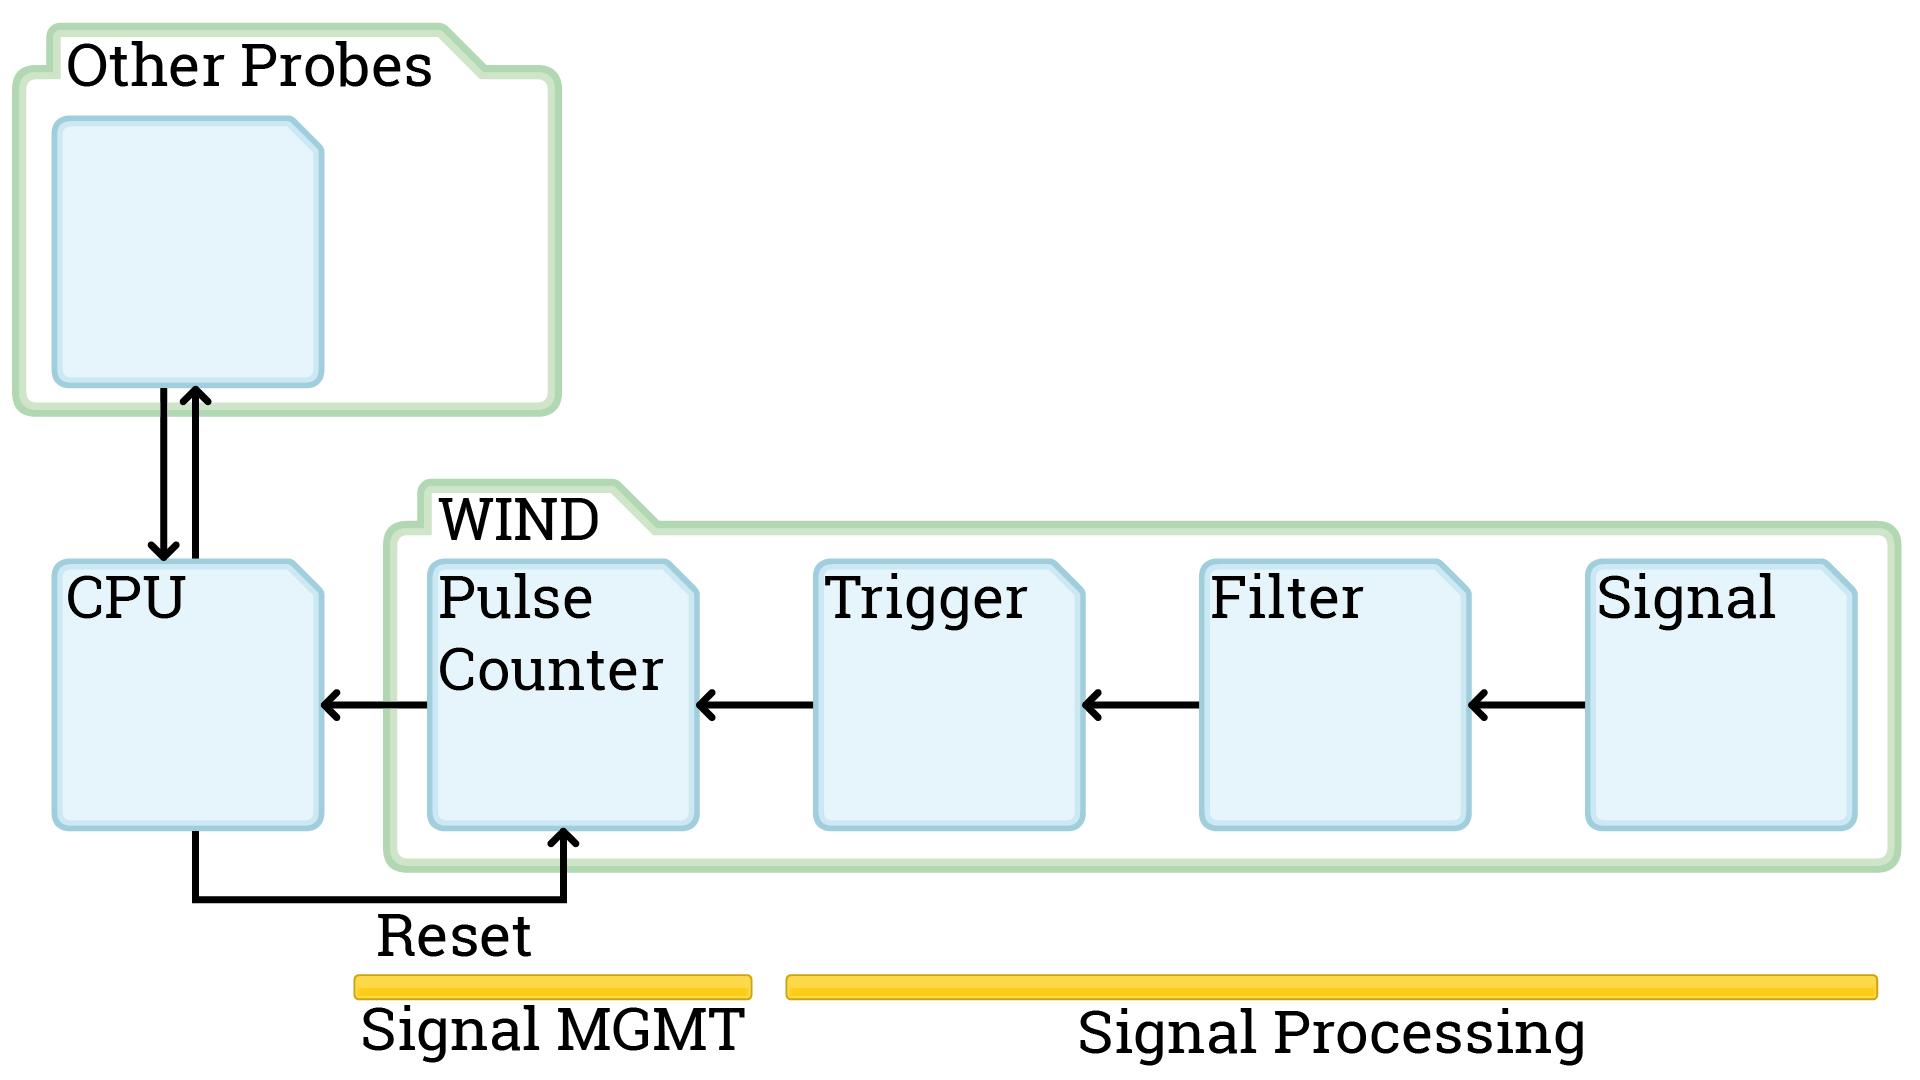
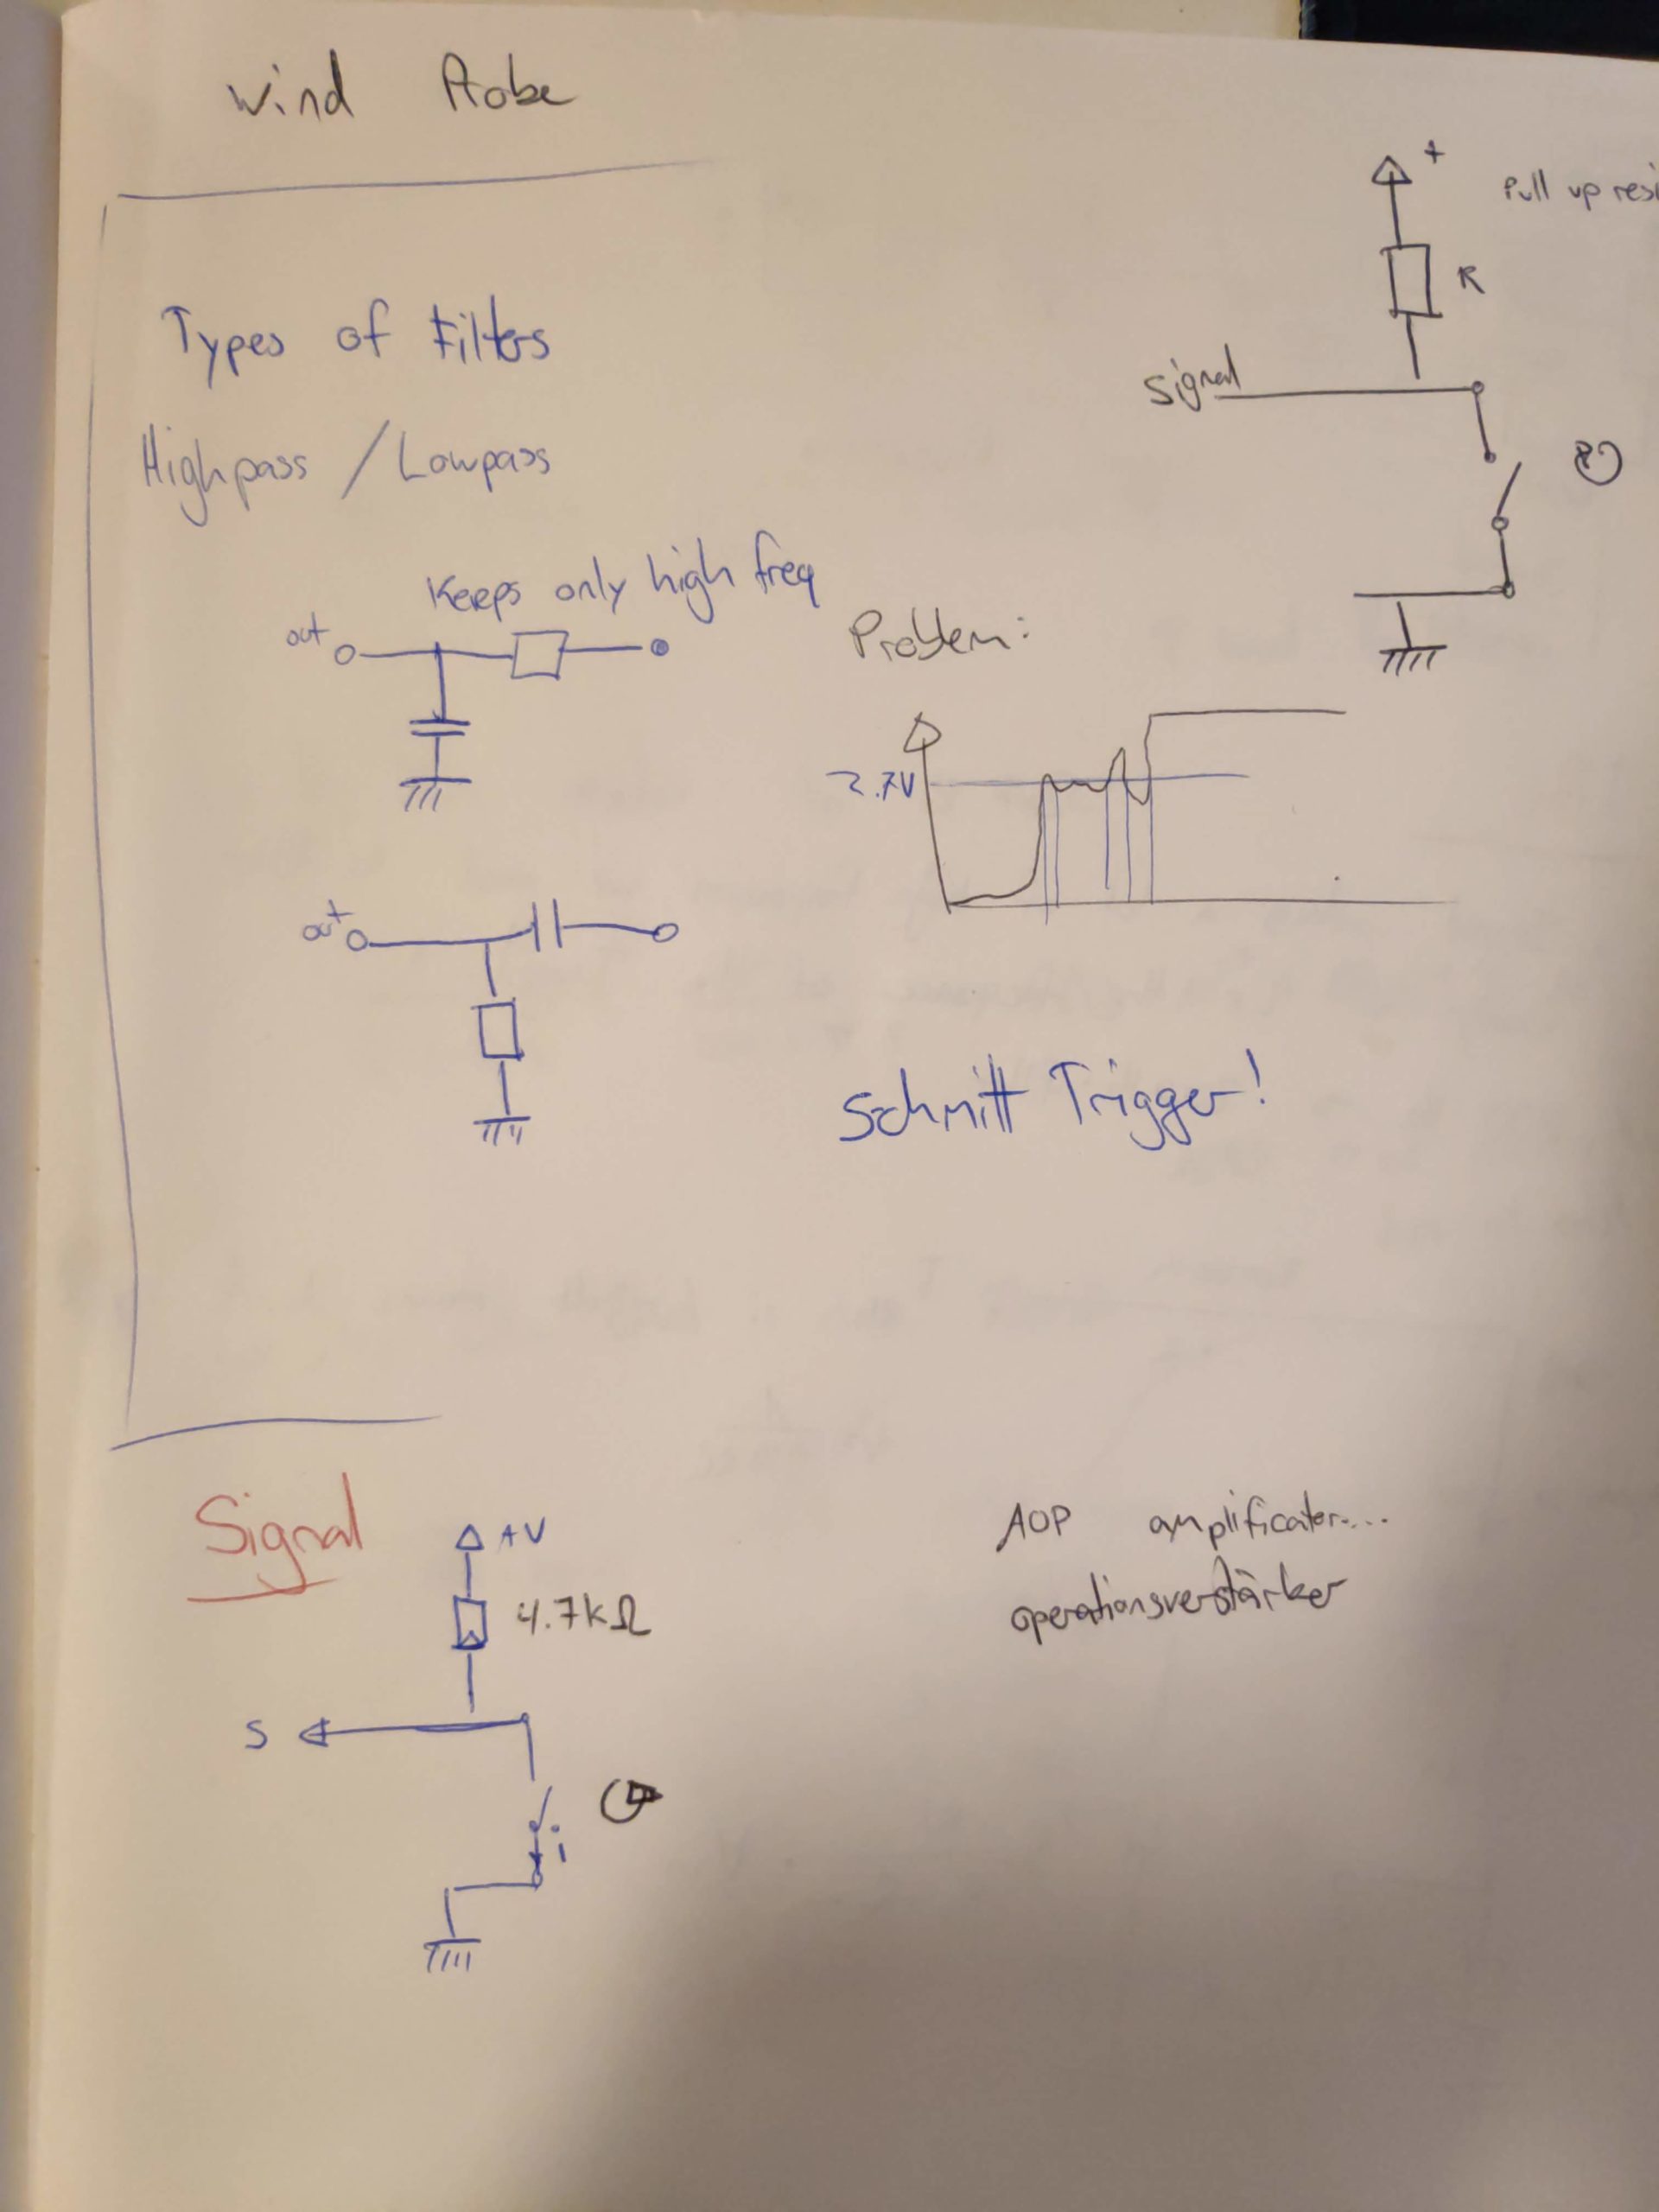
Today: The pulse counter. We had a look at how the schmitt trigger works and searched for the right component. Then we continued to draw the electrical diagram. We are now almost done with the diagram and are done with the component search. But first lets take a look at the schmitt trigger:
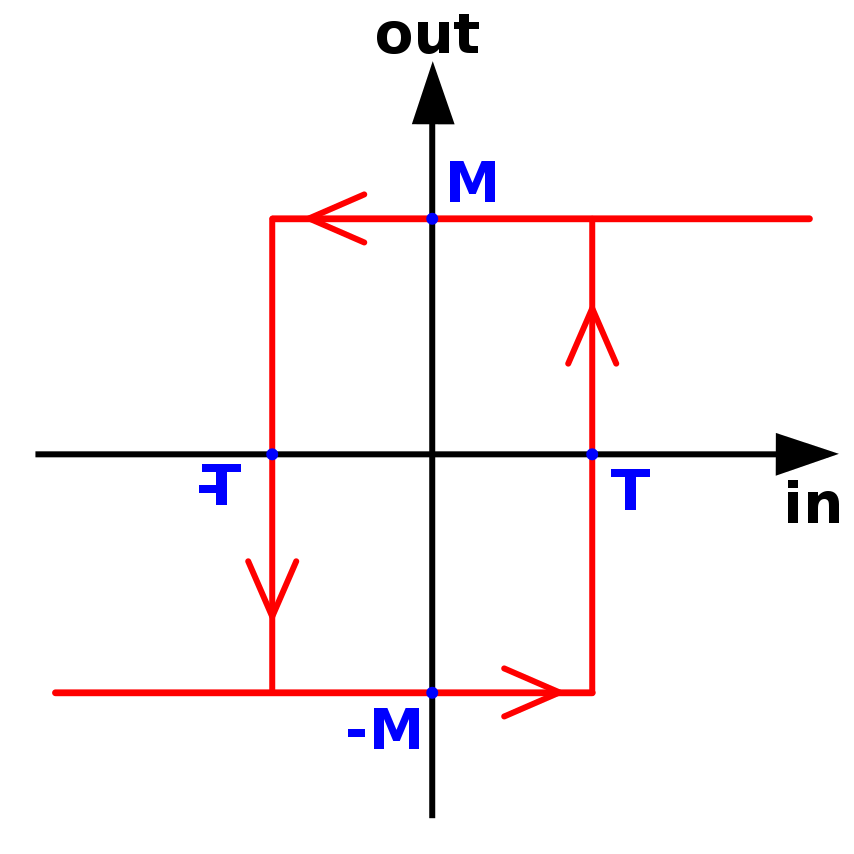
The schmitt trigger works as a secondary filter for our analog to digital wind speed measure. With the high-pass filter we can smooth the biggest highcups in switching from 0V to 3.3V. The Schmitt trigger is then responsible to get rid of voltage fluctuation around the point where our circuit switches from 0 to 1. Schmitt triggers have a different voltage to turn to 1 then they have for turning back to 0. Sounds weird, here is an example: We (probably) use the 74LVT14 (https://assets.nexperia.com/documents/data-sheet/74LVT14.pdf) and this element outputs a 1 when the voltage applied is 3.3V – 0.2V so at 3.1V and it keeps the output 1 until the input voltage lowers to at least 0.5V. If you want to read more on schmitt triggers please look at https://en.wikipedia.org/wiki/Schmitt_trigger

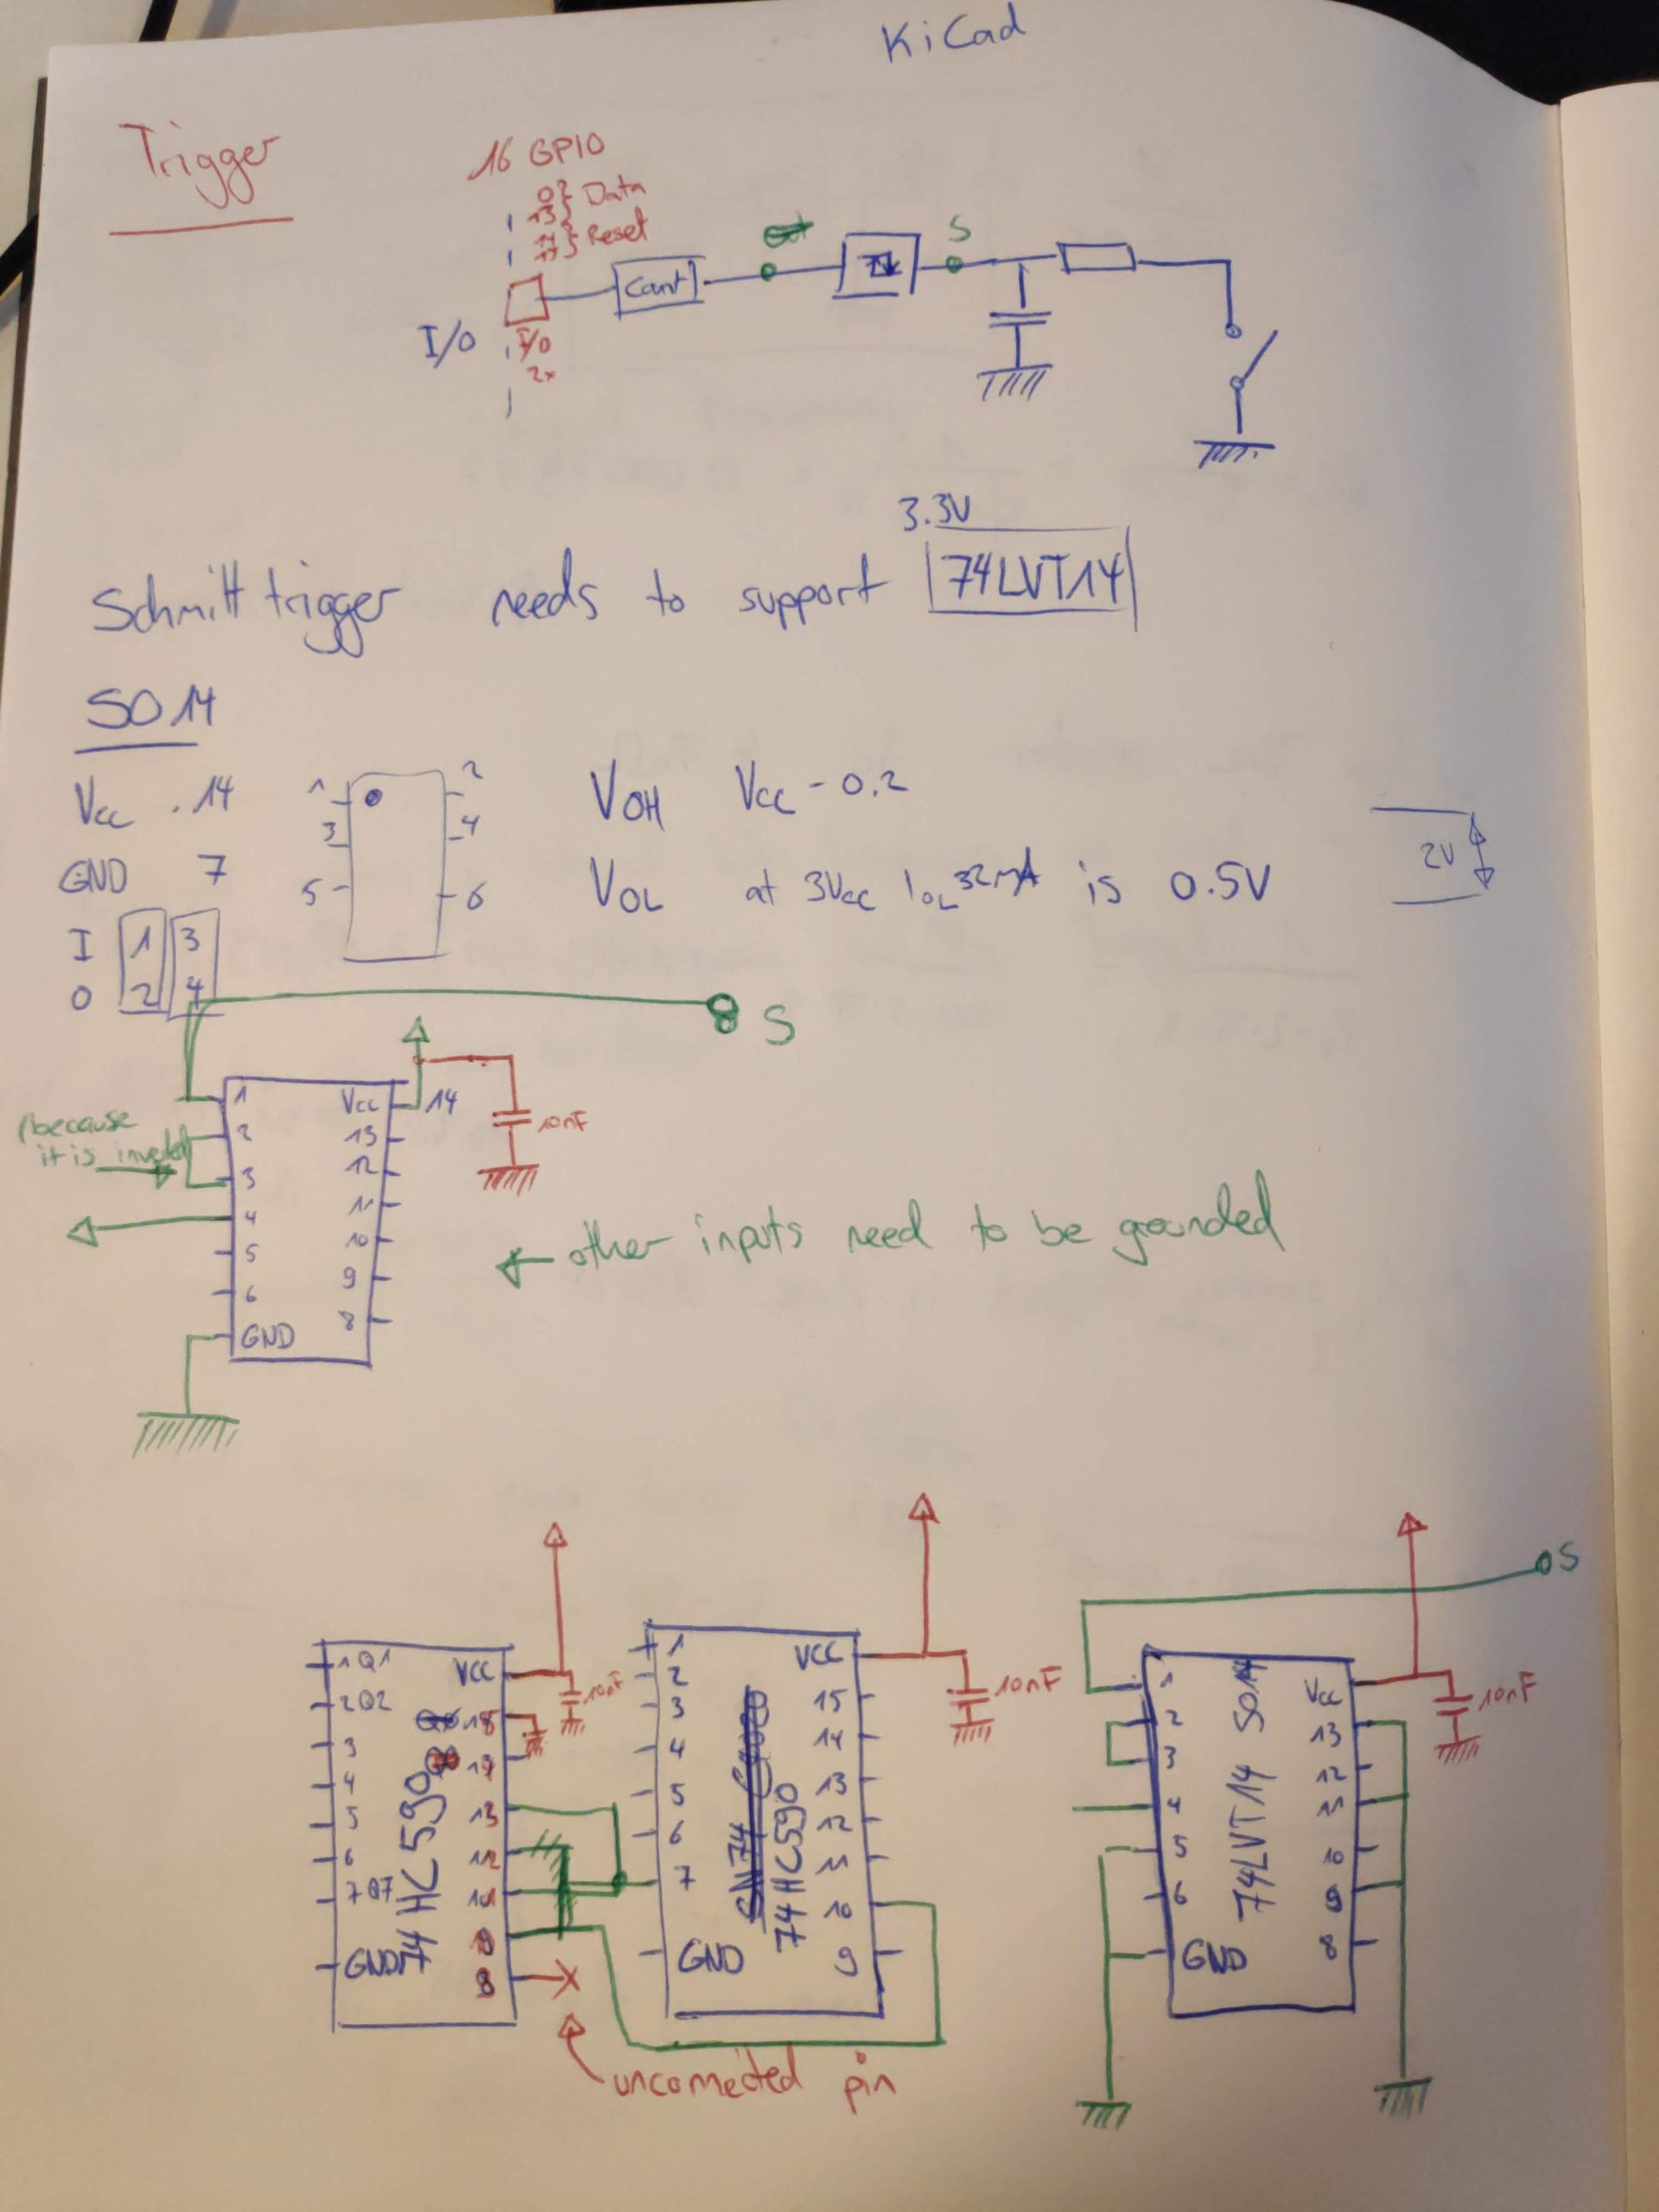
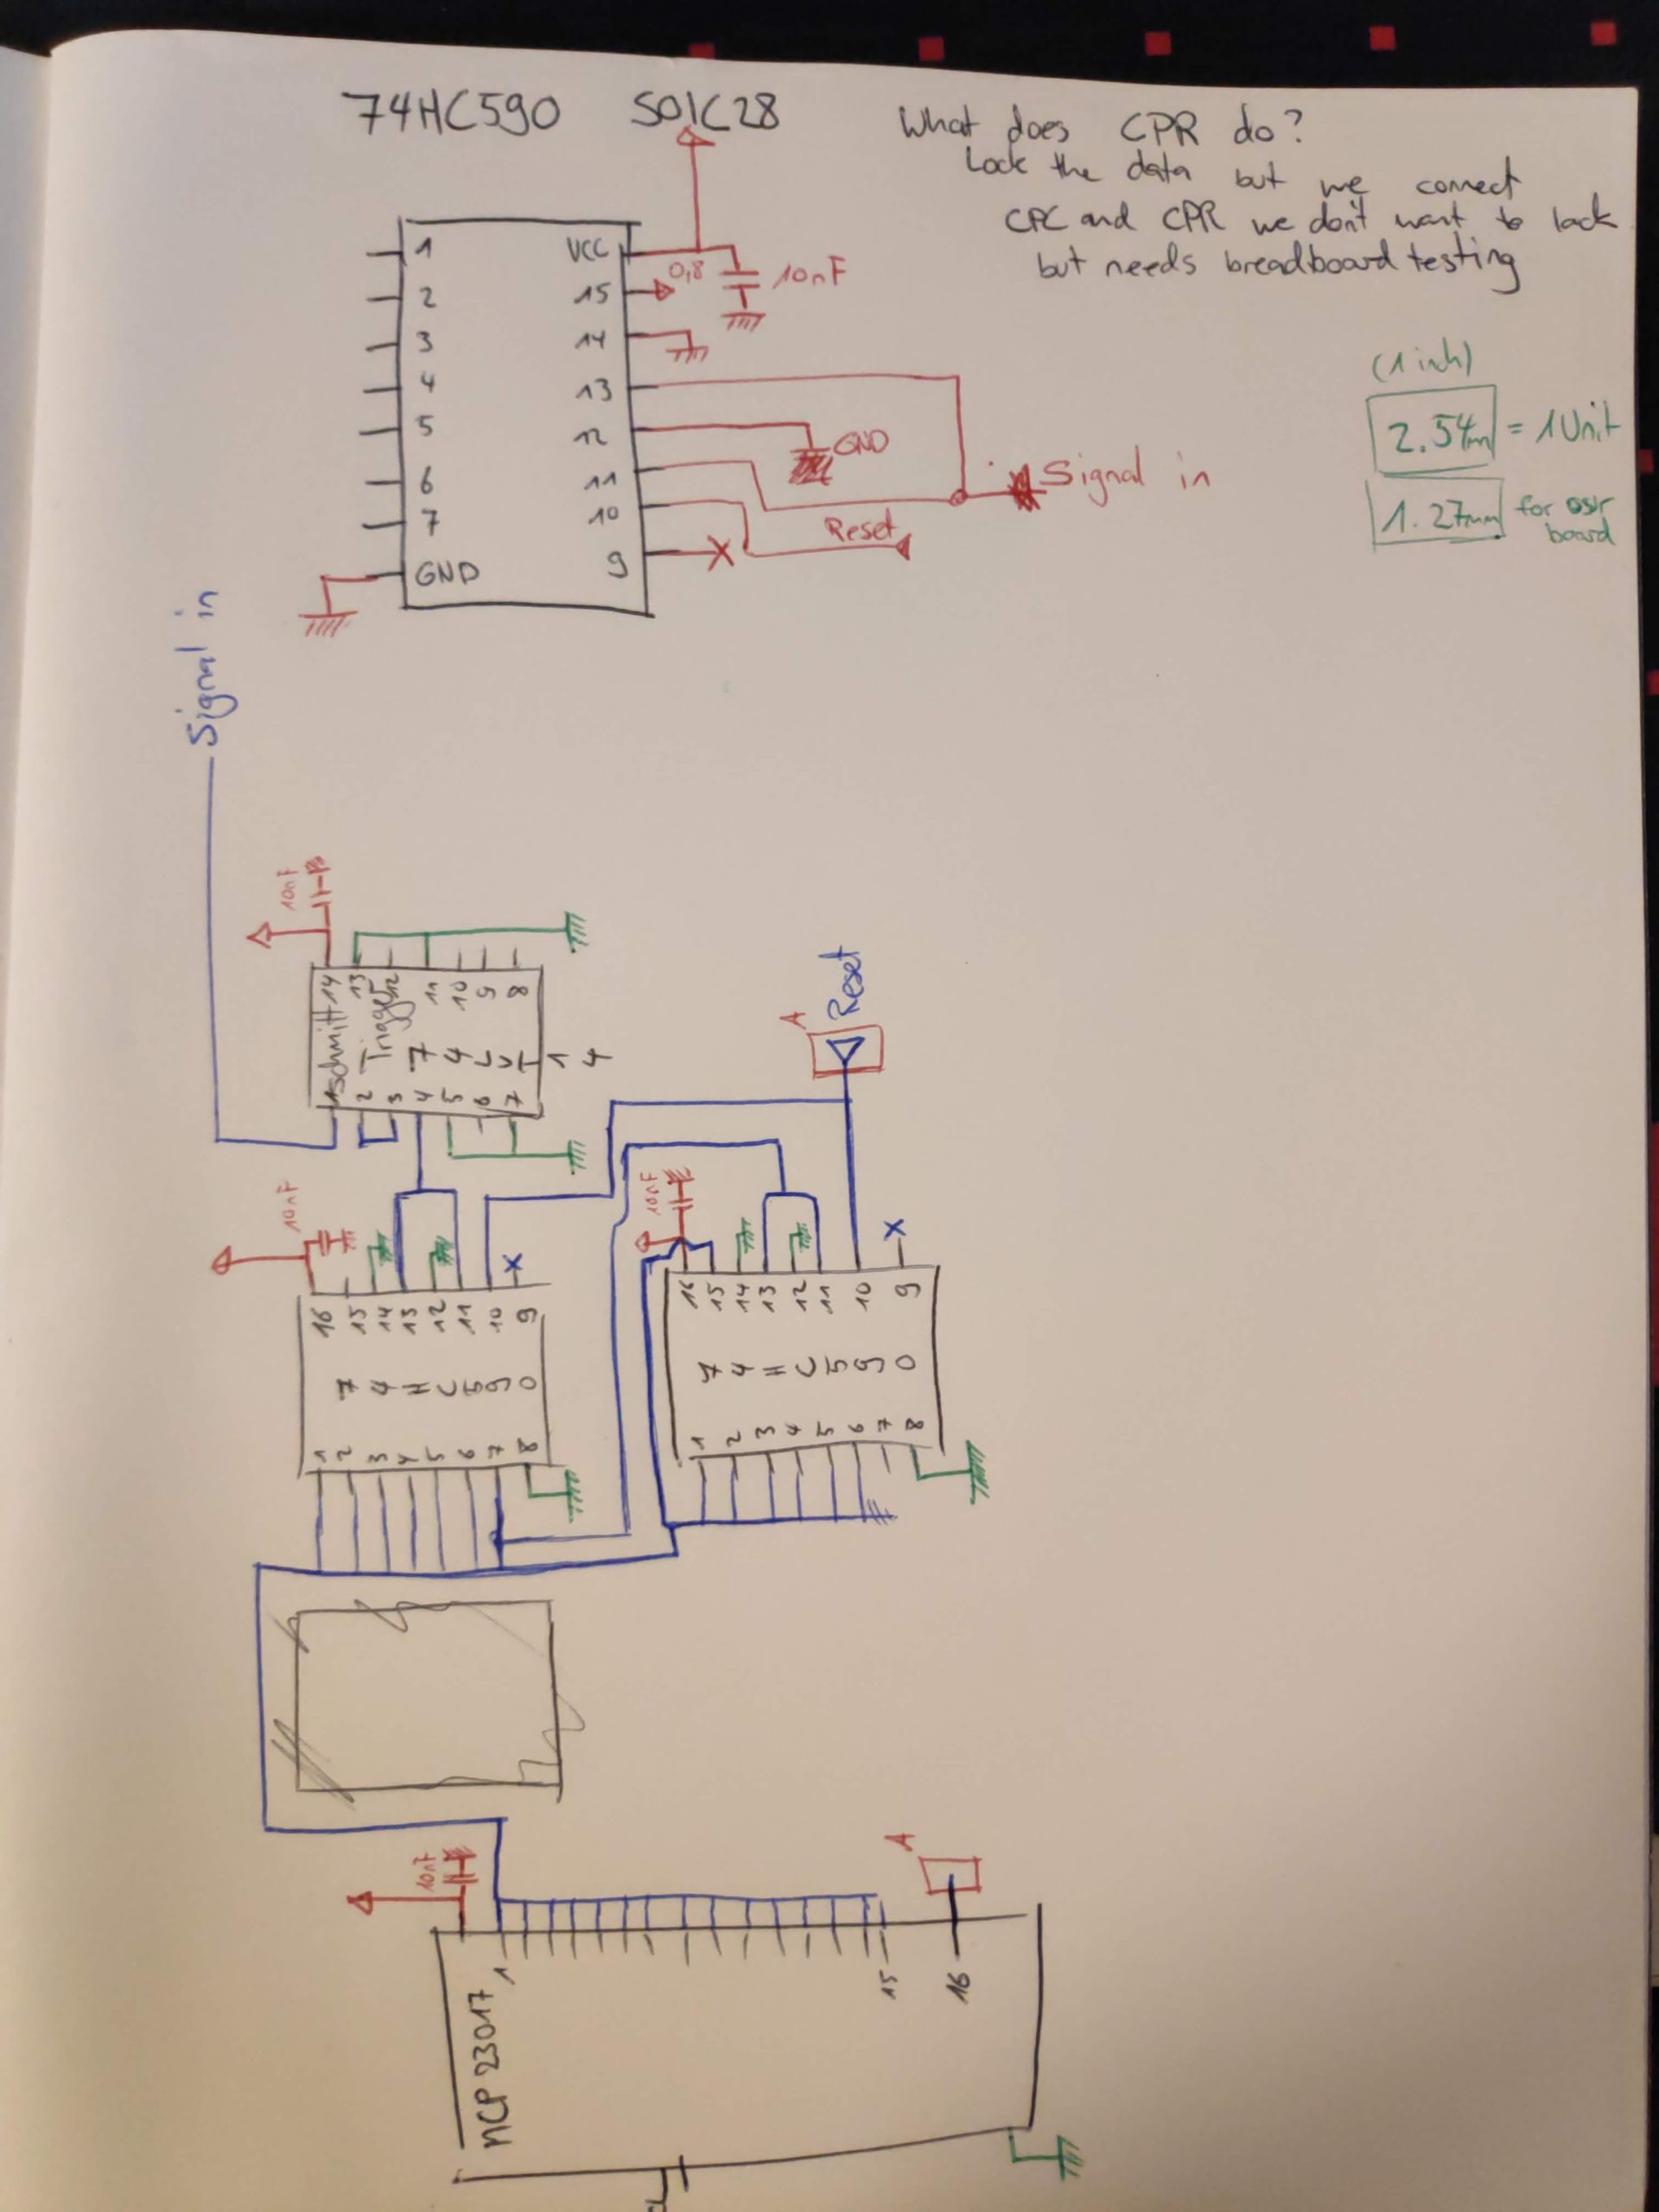
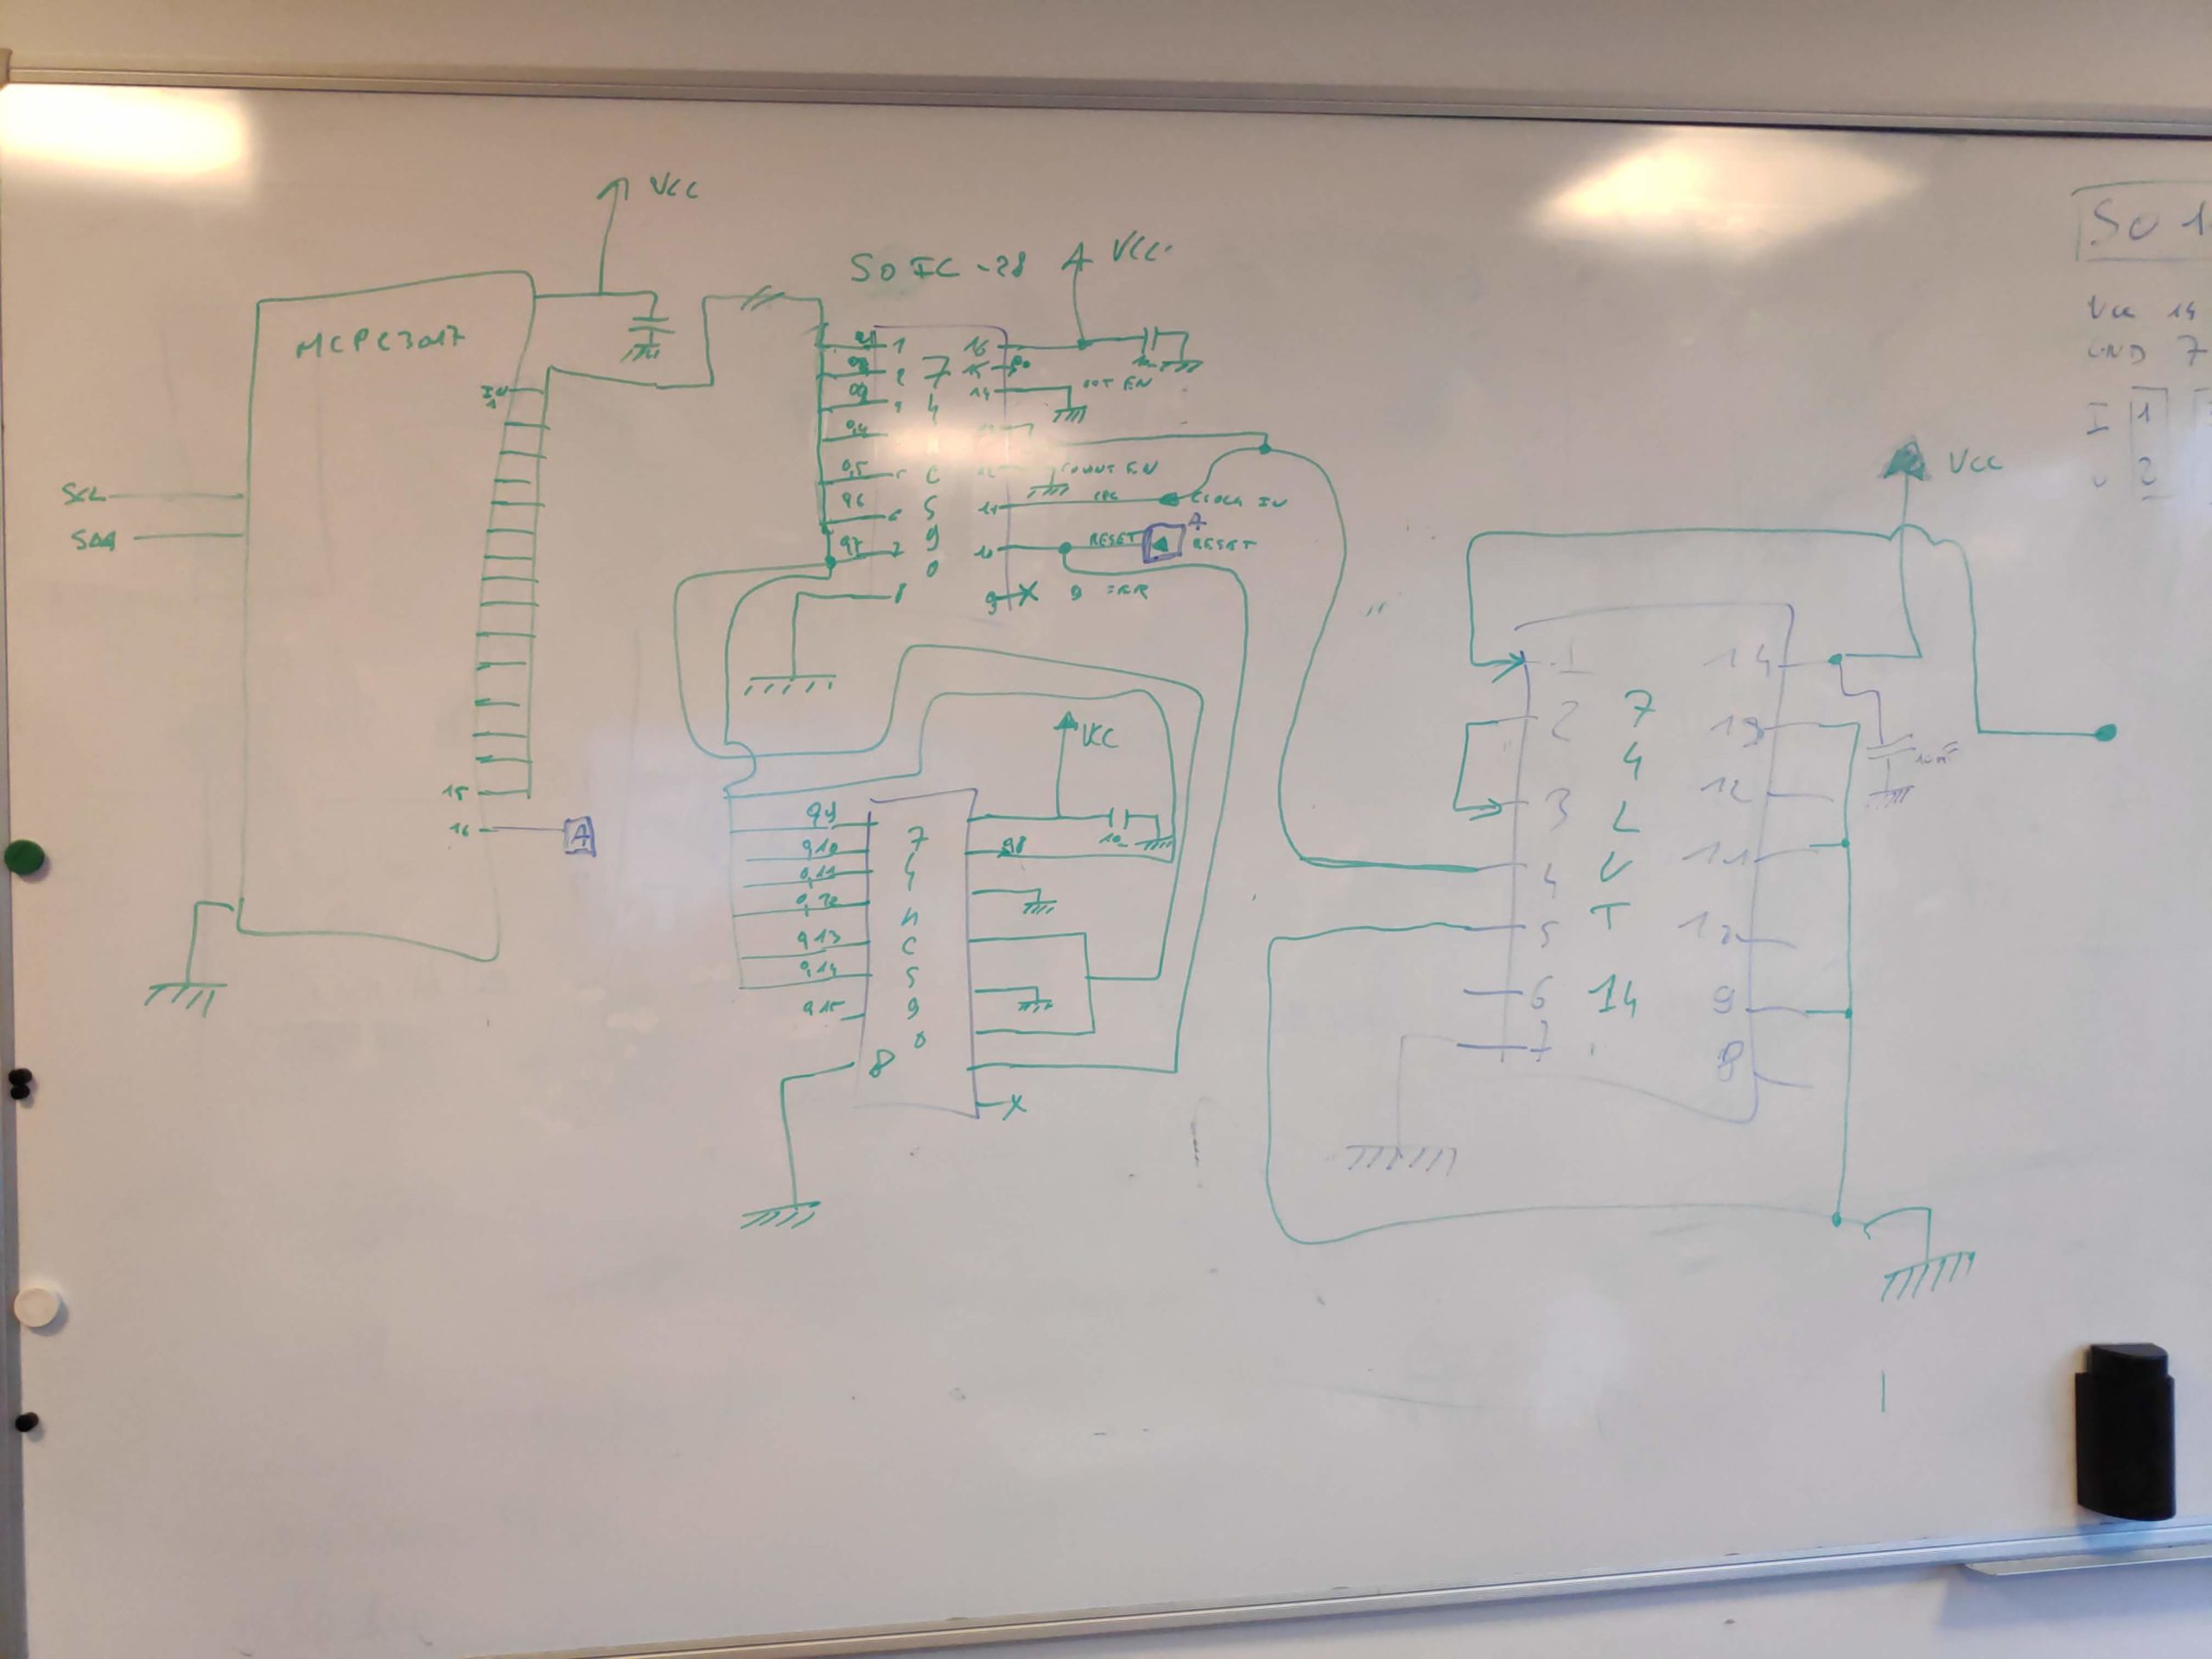
And now to the electrical diagram. We kept looking at the datasheets of our chosen elements and had to adjust some parts accordingly. We (or rather Brice) drew the circuit on the whiteboard and we checked the datasheets. This lead to a first yet incomplete diagram. We work internally on a diagram and I started a github repo for people who want to see more of it. We are using KiCad as a free and very good tool to draw the electrical diagram, PCB design etc. You can find the Github repository here https://github.com/TheCell/Weatherstation.

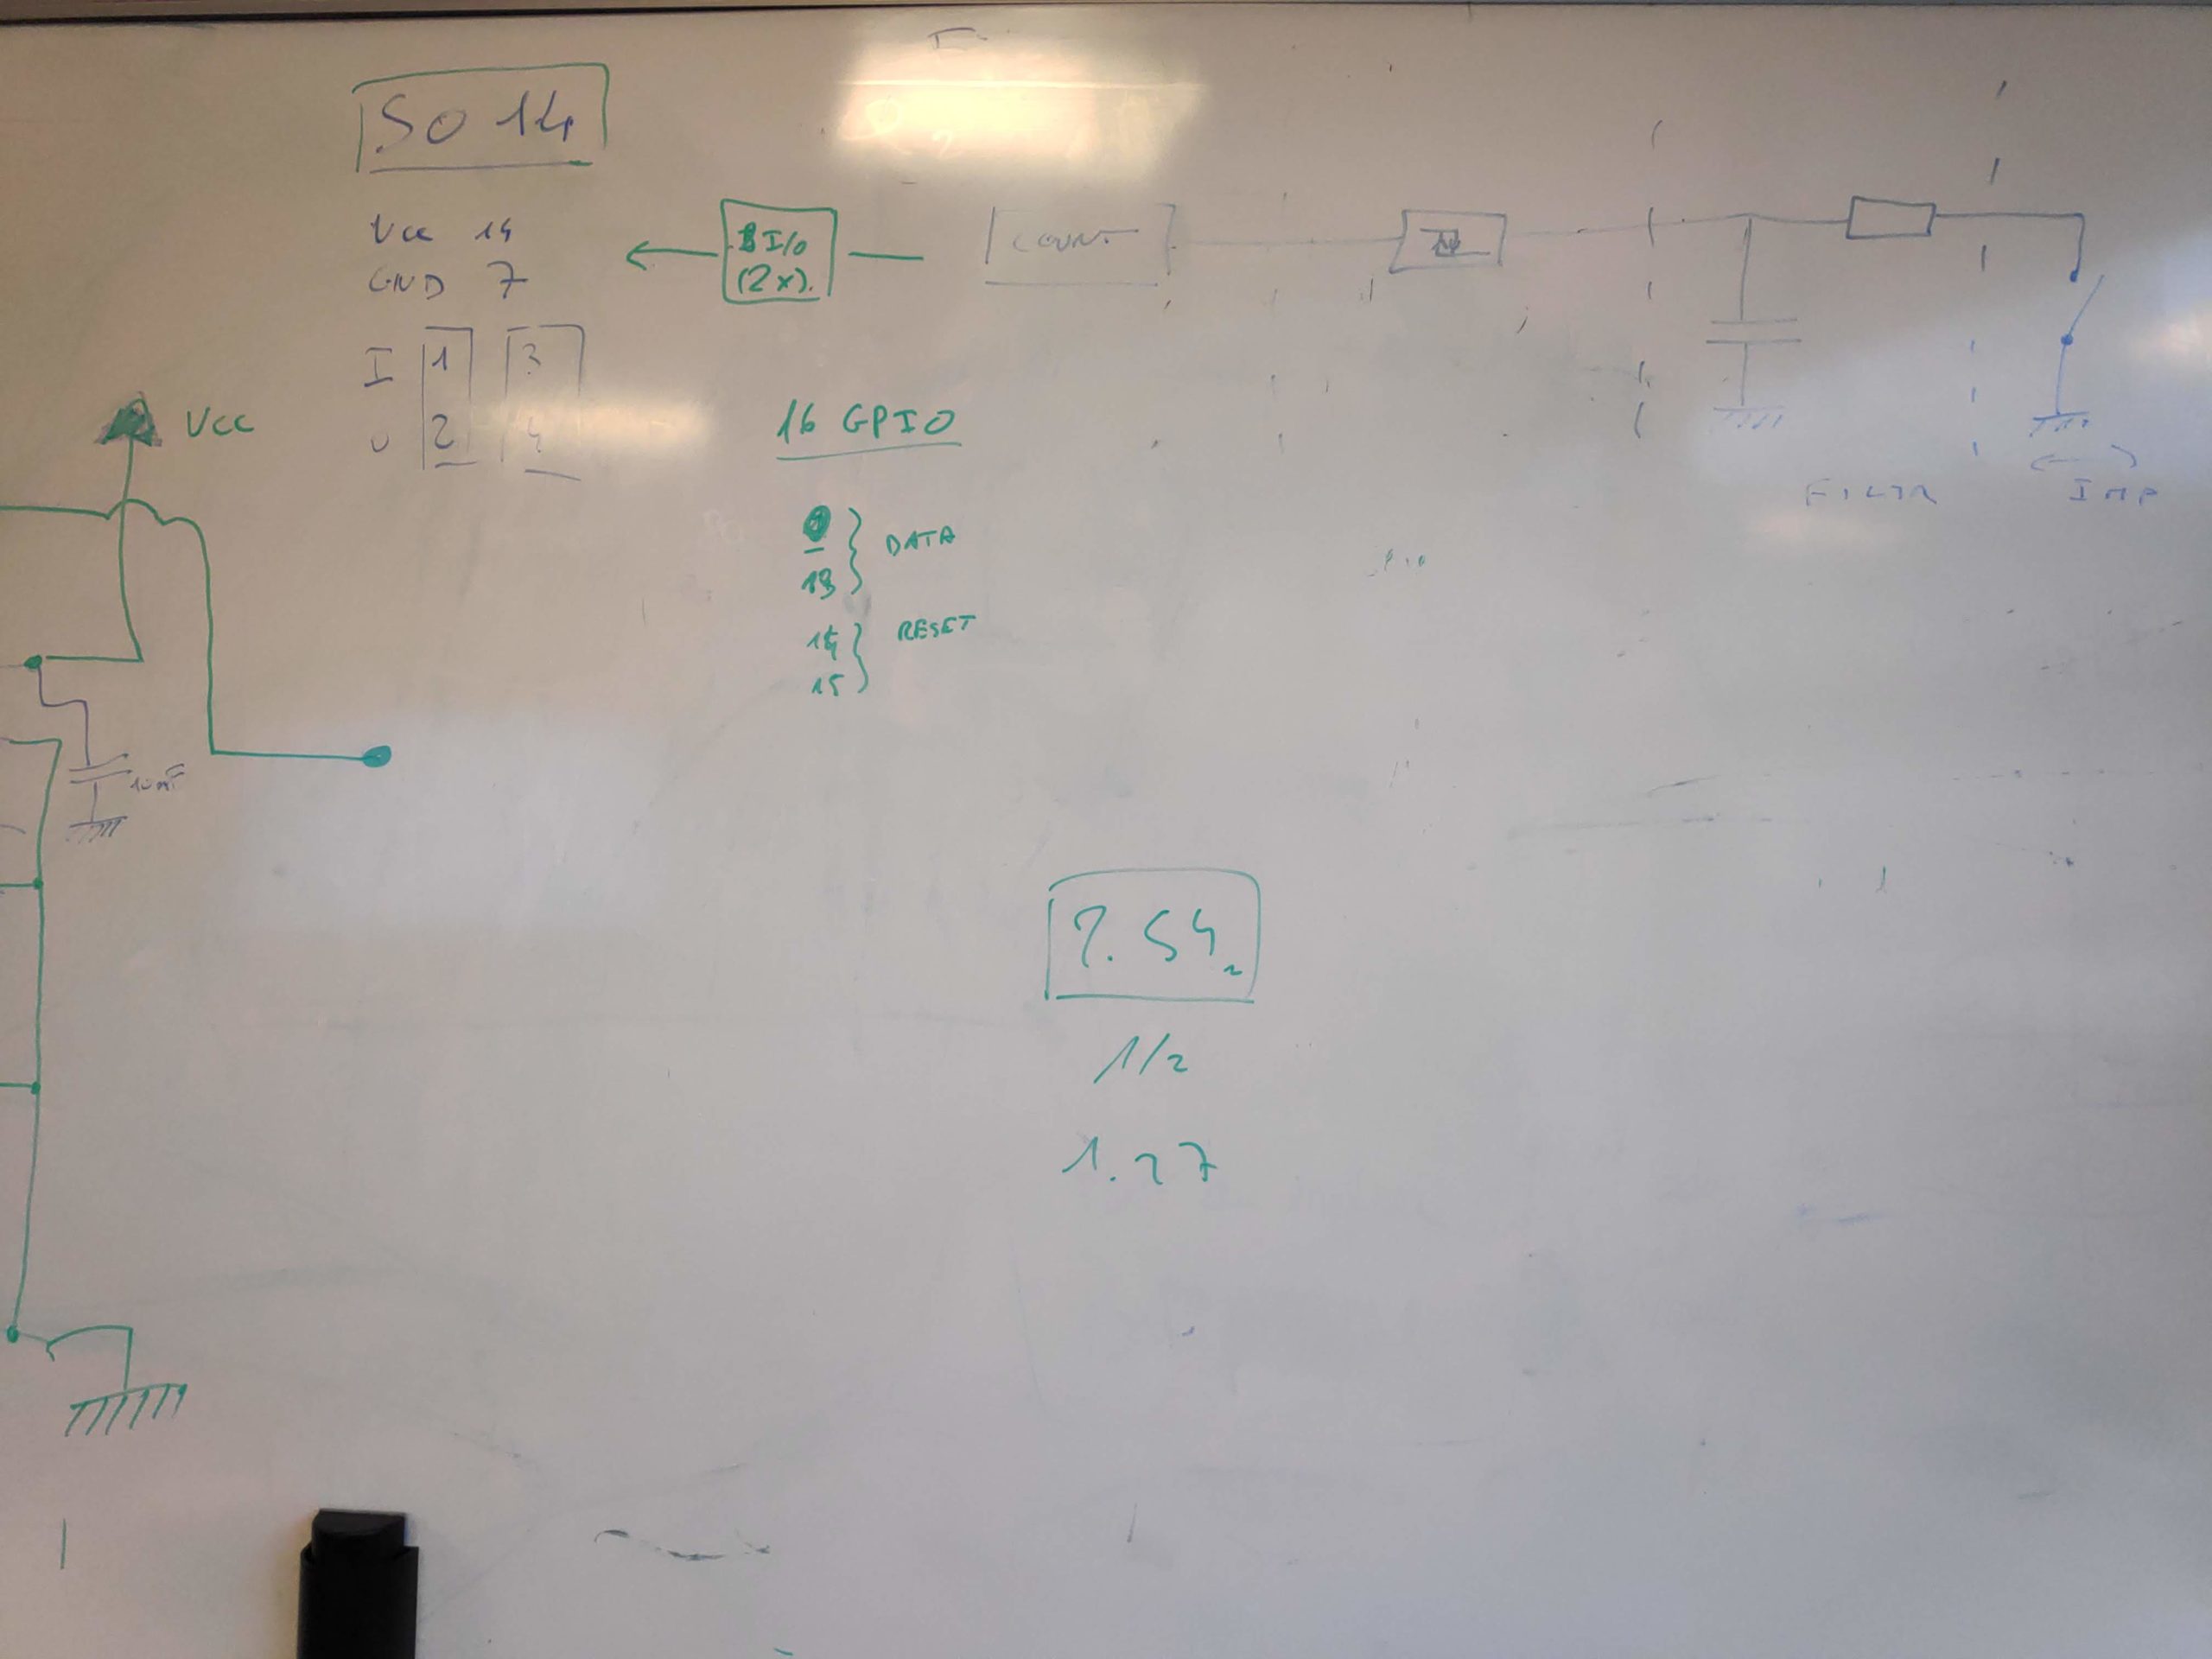
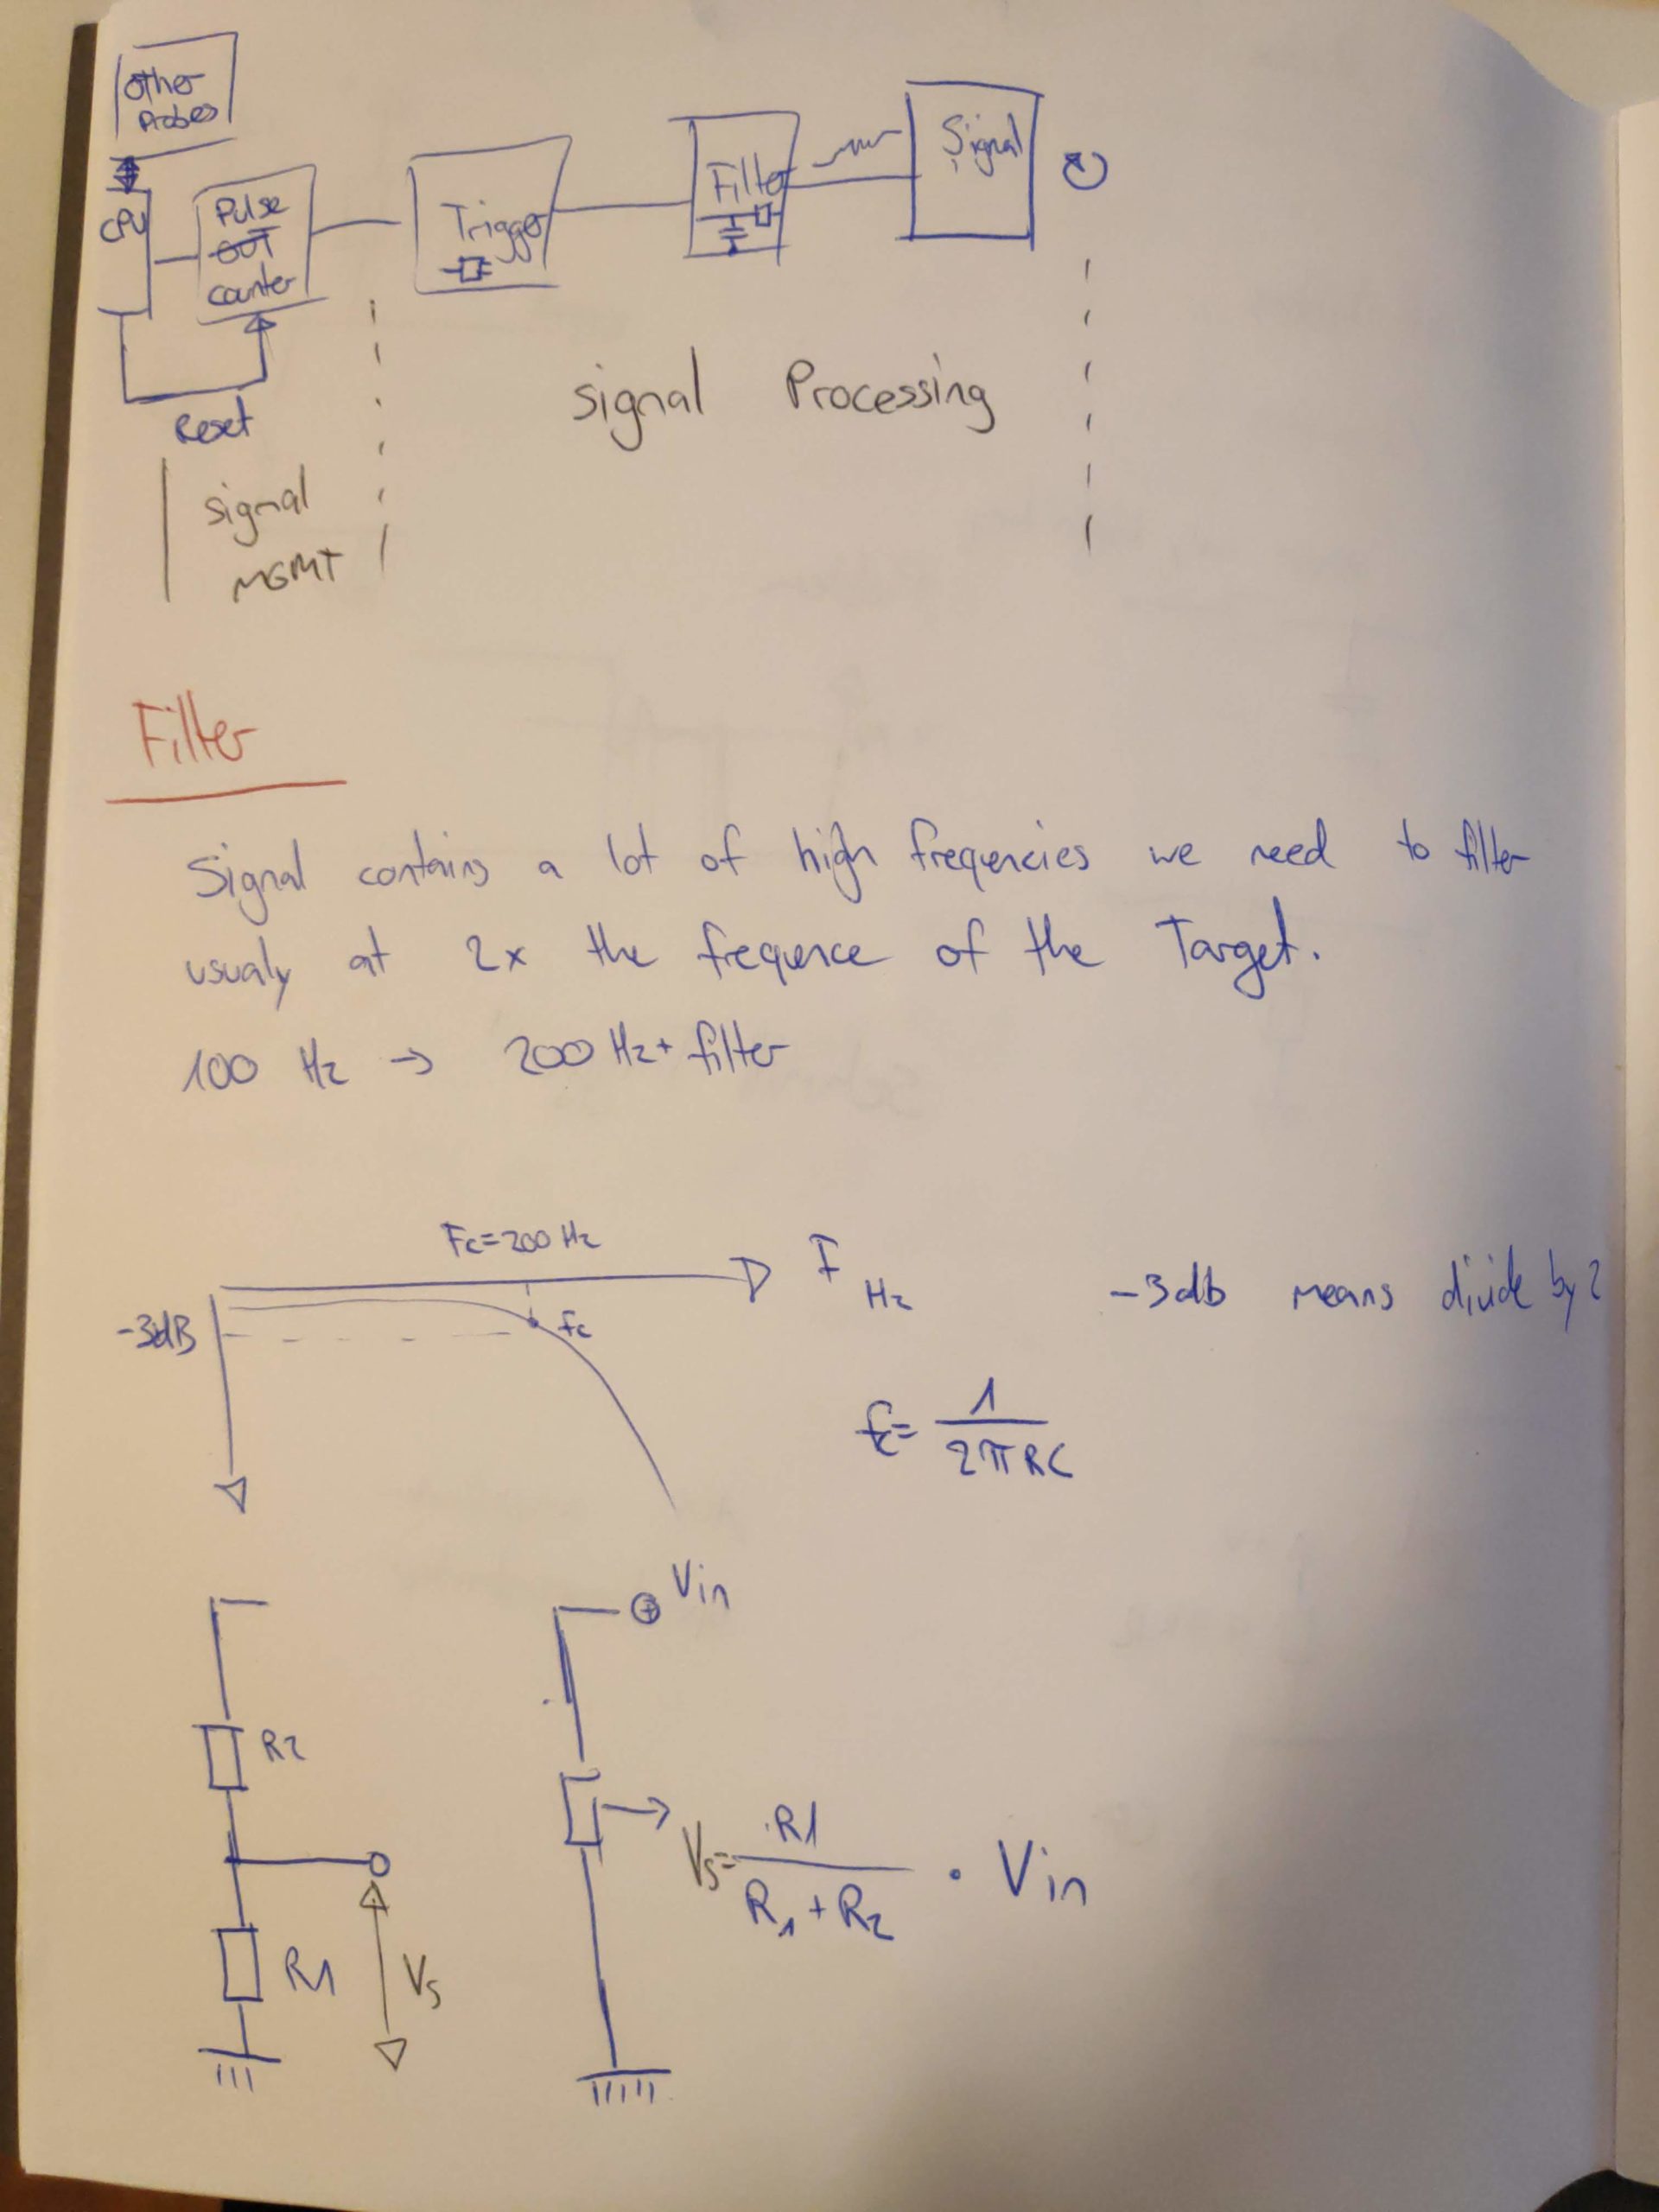
And for completeness here are my notes and the whiteboard photos.
The game is a mix of sidescroller jump’n’run and soulslike games. For every new territory you go to you have to learn the layout until you find the cartographer who sells you a map of the region. You get money from killing enemies and when you die you lose everything until you fight your way back to your ghost and kill the ghost. If you fail to do so and die a second time all your money is lost. I liked the challanges of the game but not so much the backtracking. There is a “metro” but still you have to travel a lot of the region to get to a place and ultimately that is what prevented me from finishing the game. At one point I could not be bothered to continue because I spent 12 hours playing and felt it is not worth spending another 12 to finish the game.
As usual a selection of screenshots can be found on imgur and the full set of screenshots can be found in my steam library: https://steamcommunity.com/id/Thecell/screenshots/?appid=367520&sort=oldestfirst&browsefilter=myfiles&view=imagewall
And the game itself can be bought on Steam or on GOG

Today we specify a part of the signal processing for the wind measure: Signal Filtering. This is needed because we are going from analog to digital and that comes with problems. Namely corrupted bits. With signal processing we want to get rid of problems arising when energy currency switches from 0 Volts to 3.3V where for example the circuit is switching from a 0 bit to a 1 bit at 2.7V but analog is not always so definite.
As a first step we want to filter out wrong bits. They get generated when the powersource switches from 0V to 3.3V and from noise in the energy currency. It is possible for our circuit to read multiple switches from 0 bit to 1 bit and back until the analog energy currency is at a stable 3.3V. This would go a bit too for the blog though. There is noise on the power source that can generate these errors. Next week we will work on the schmitt trigger to ensure that a digital bit is a stable 0 or 1 until the voltage is way over the circuit treshold.
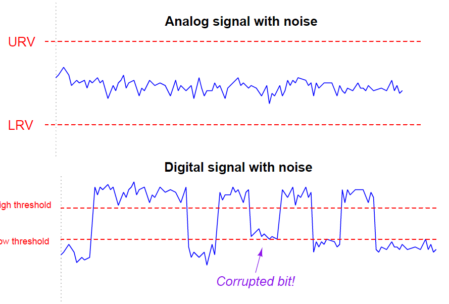
For more information on the problem see: https://instrumentationtools.com/signal-coupling-cable-separation/
To get rid of most of the noise we take a look at what we designed our system to read: 100 Turns/second or 100Hz. We want to filter out noise thats around 2x the frequency and higher. For this we will use a high pass filter. (Just for completion there exists a low pass filter aswell).

For this to be useful we already know some properties we want to have:
- 100 Hz frequency
- filter around 2x the frequency and higher (200Hz)
- The formula frequency Fc = 1 / ( 2*π*R*C ) (https://en.wikipedia.org/wiki/High-pass_filter)
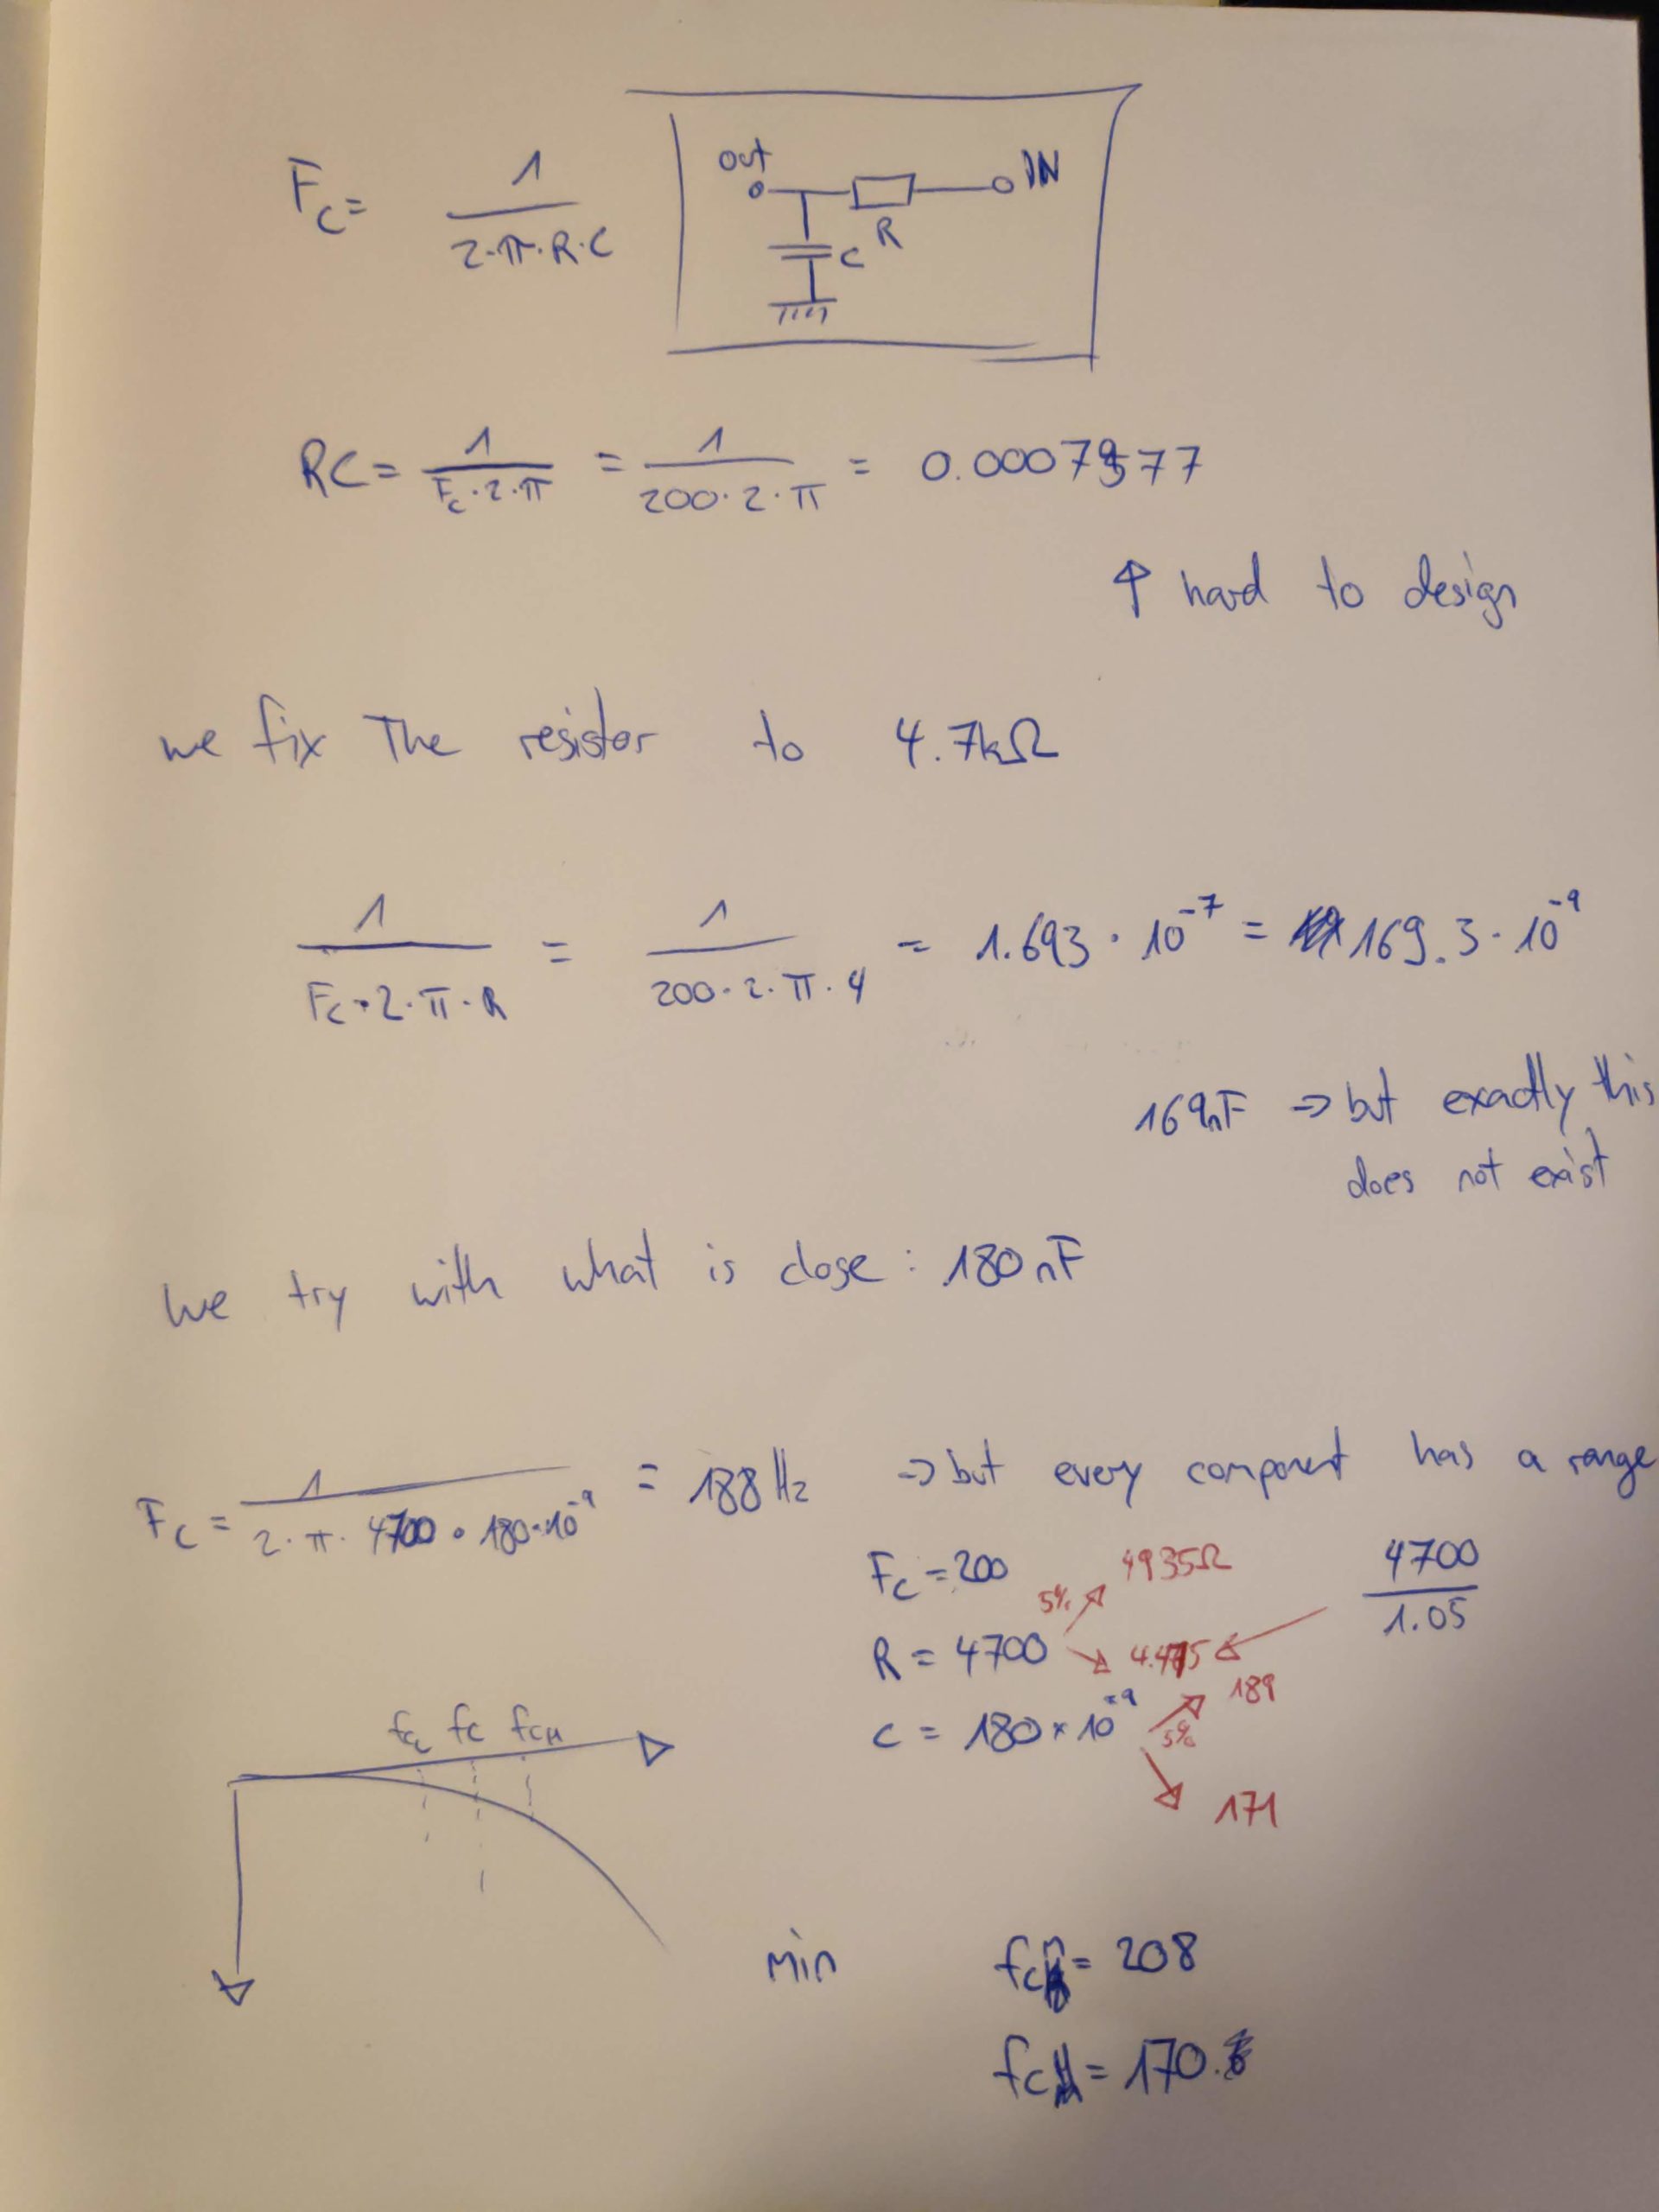
Now we need to find what electronic elements we need. We fix the resistor to a widely used number: 4.7kΩ or 4700Ω this leaves only one unknown number in our formula, the capacitor. C = 1 / (2 * π * R * Fc) = 1 / (2 * π * 4700 * 200) = 1.693 * 10^(-7). Our ideal capacitor therefore should have 169 nF (nano Farad). This electronic element does not exist so we look for the closest electronic element: 180 nF. Now we know all electronic parts for this part of the circuit. One more problem: Electronics have a range and not an exact value, manufacturers therefore always provide the parts with a ± 5% or ± 10% guarantee. To be sure our high pass filter will not filter out the frequency we are aiming for we have to calculate the worst case frequencies the high pass will filter.
Resistance R = 4700Ω ± 5% = 4935Ω; 4476Ω
Capacitance C = 180nF ± 5% = 189nF; 171nF
(to calculate the lower number we need to calculate value / 1.05 and not value * 0.95)
We now plug these values back into the frequency formula to see what the worst case circuit would filter out. This results in 170Hz to 208Hz. From experience we can say that 170Hz is far enough away from the 100Hz to not filter out our maximum frequence we were aiming for.
And with this we have our first circuit part defined, the filter is ready to be tested on a breadboard. For completeness I included the notes from our meeting. Thanks again Brice Giboudeau and Francois Moutou for this great lunchbreak.
At work I started participating in a D.I.Y. club where we will build a weather station. This should reflect the weekly progress and what we are working on. Additionally this should in the end be a tutorial for a complete weather station based on a Raspberry and everything should work with the I2C protocol. Let’s start.
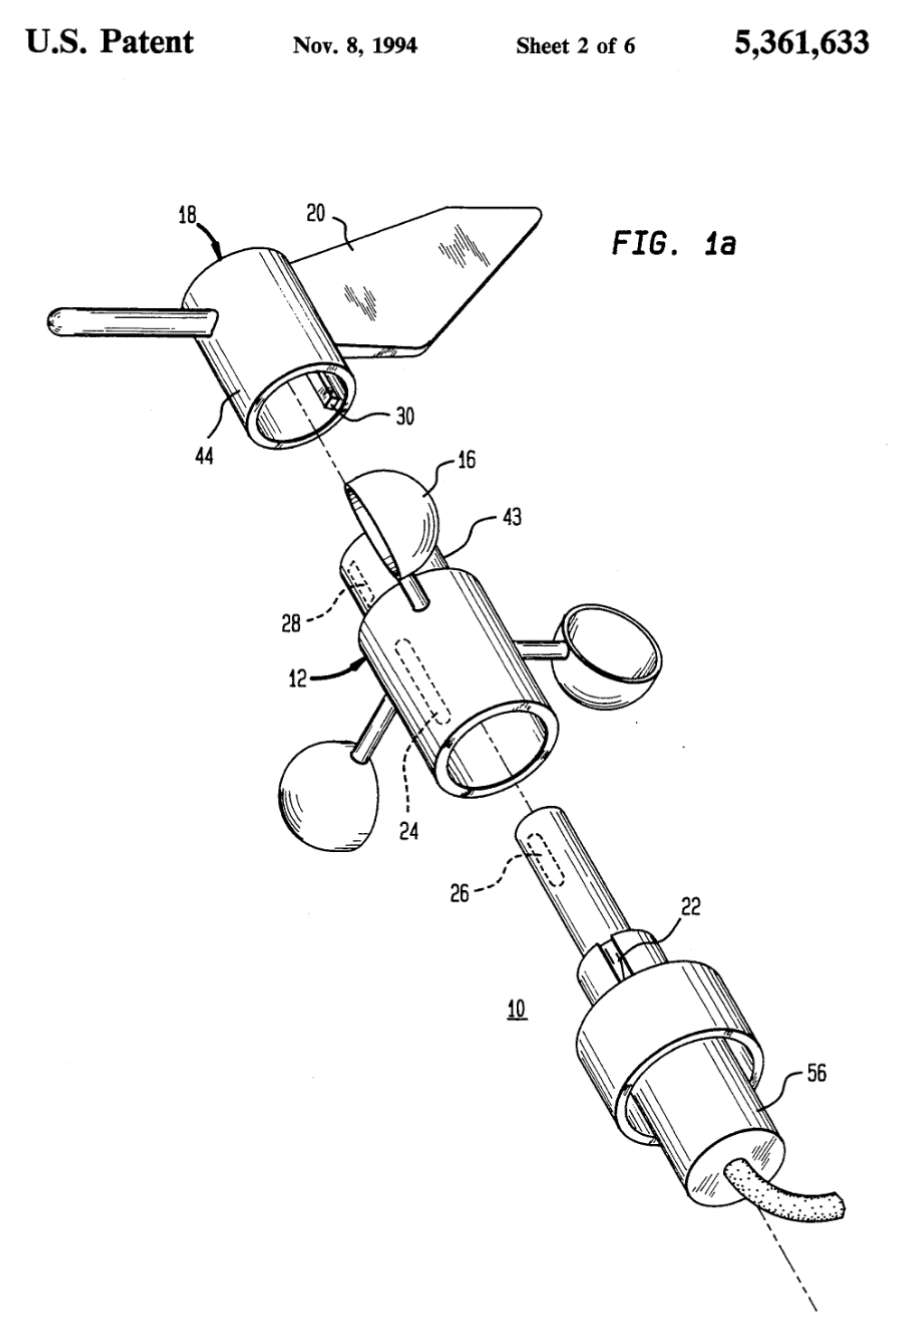
First we got an introduction by Brice Giboudeau on how an anemometer works. There are various options on how they work. Here is a list on what else is out there, but we looked into one that counts impulses. Basically there is a magnet attached to the rotating top and in the inner part is a reed switch that closes whenever the cup makes a rotation and passes the switch. We will want to count these and calculate the wind speed from there. Because we want to create a low power solution we will not count these with the Raspberry directly and instead have a little circuit that updates the raspberry occasionally.
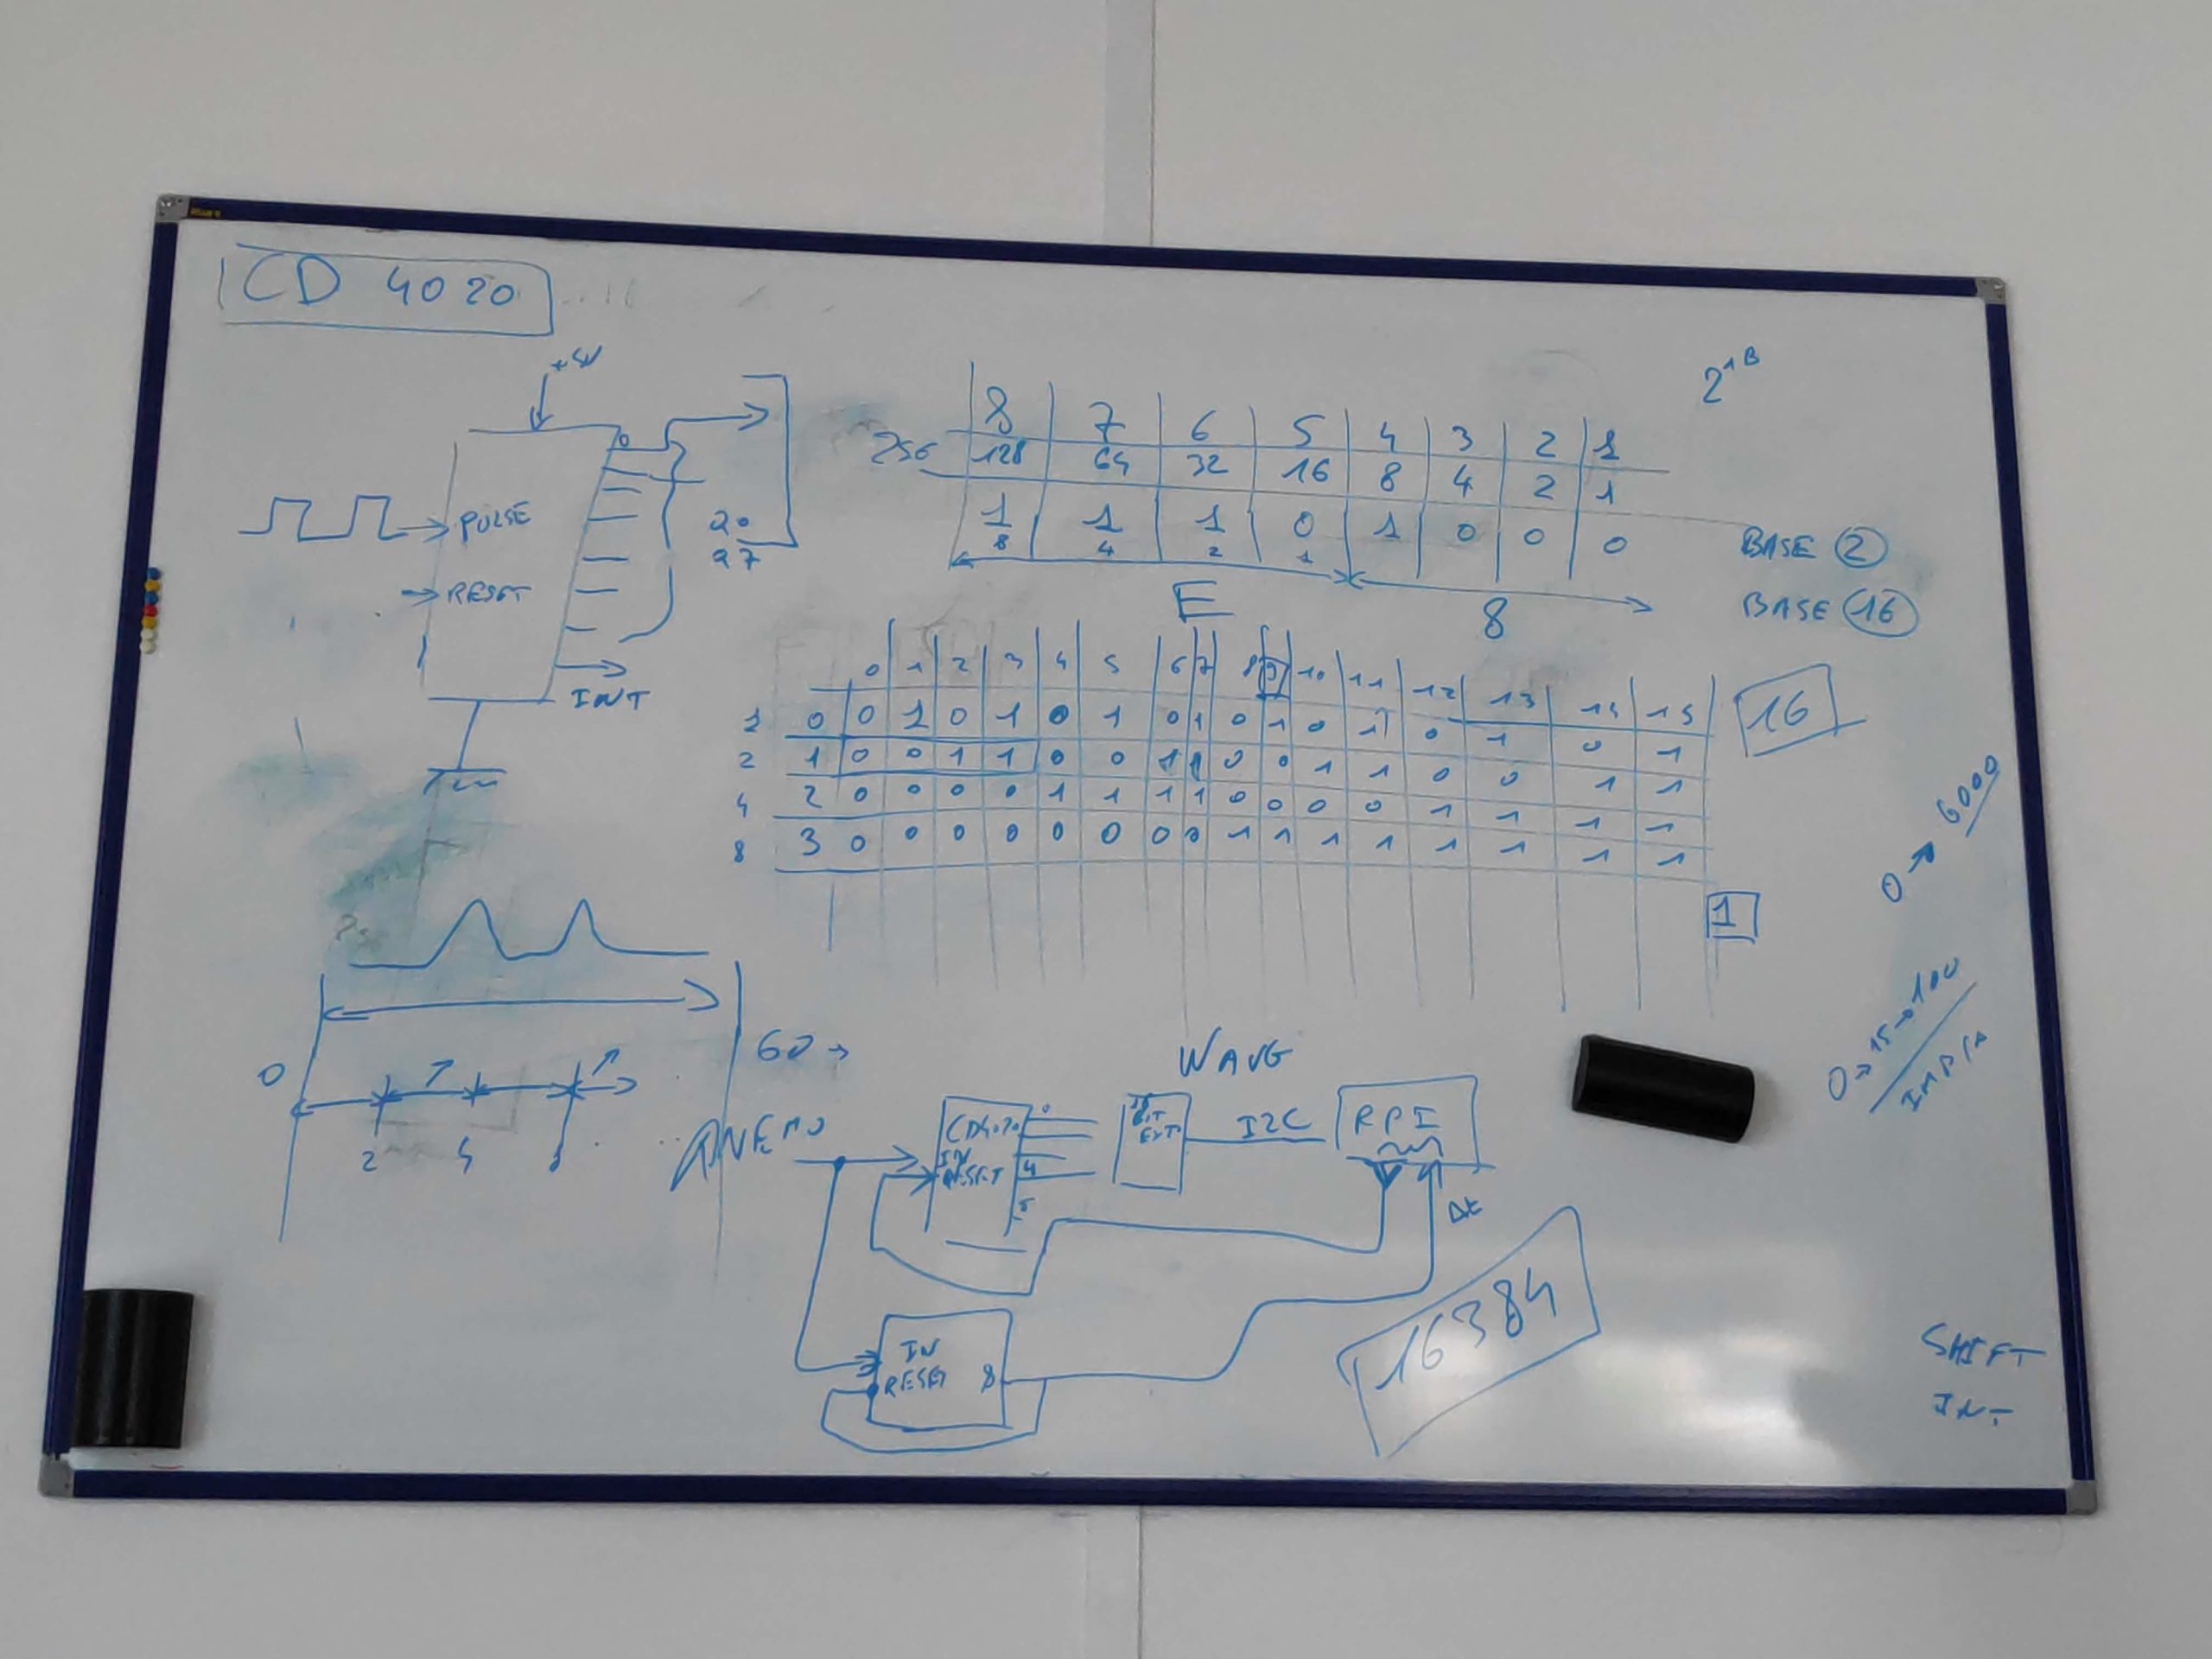
For the Windspeeds we want to meassure average speed and also wind ghusts. This we will do via a ripple-carry binary counter: https://www.google.com/search?q=cd4020 Of course 14 bit is way overkill but we can reset the counter with any bit convenient.
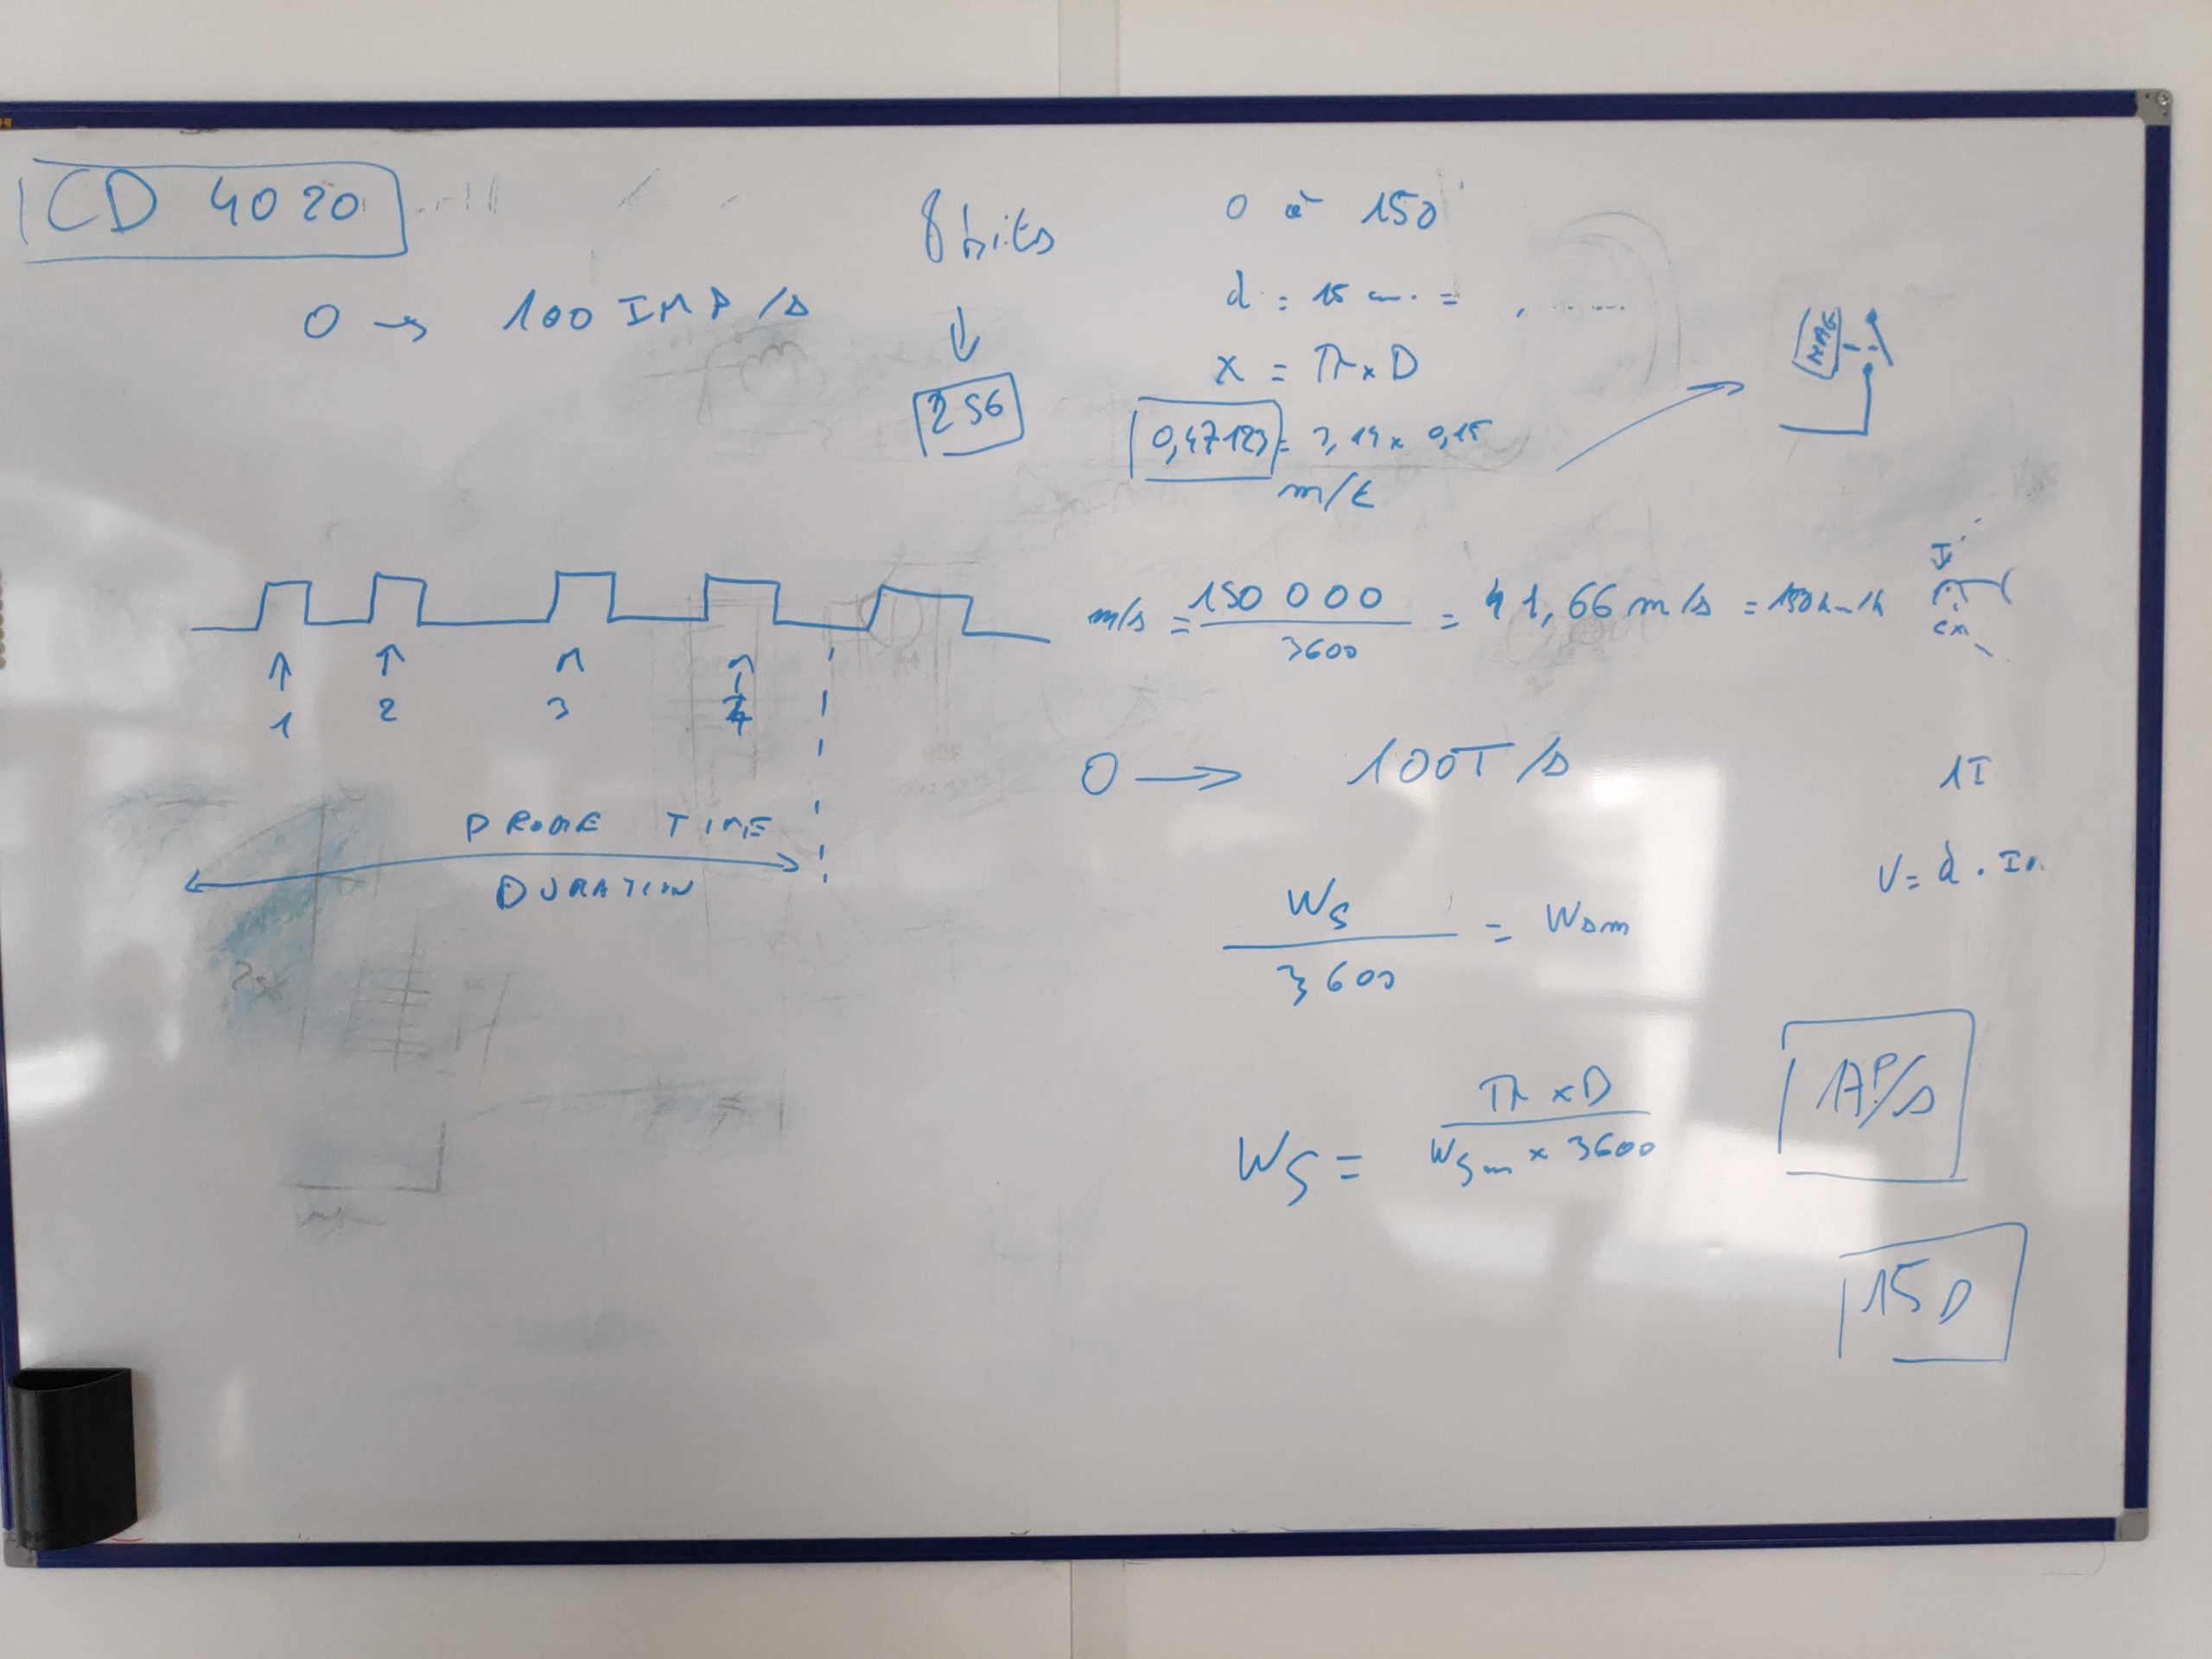
We go for 30 km/h average speed and want to meassure up to 150 km/h windspeeds. Resulting in Windspeed Ws: 150000m/3600s = 41.66 m/s. First we calculate how many impulses this will generate which we have to count:
If we have an anemometer with 0.15m diameter and we want to know how many turns it rotates per meter we calculate:
The circumference C of our anemometer: C = diameter * π = 0.15 * π = 0.471239. This means our anemometer has a circumference of 0.47 meter.
Based on this we can calculate what our circuit must be able to support. Revolutions (T for turns) per second: Ws / C = 41.66 / 0.471239 = 88.6 turns / second. For our project we will calculate with 100 T/s to be safe.
If we want to pull windspeed data only every minute this means that we need to count up to 6000 Turns per minute. Additionally we will want to display wind ghust speeds. We will do this via interrupt, a second CD4020 will update the Raspberry whenever it counts 256 rotations and the Raspberry will track time between interrupts. Luckily our CD4020 is a 14 bit counter resulting in 2^14 (16384) counts before overflowing.
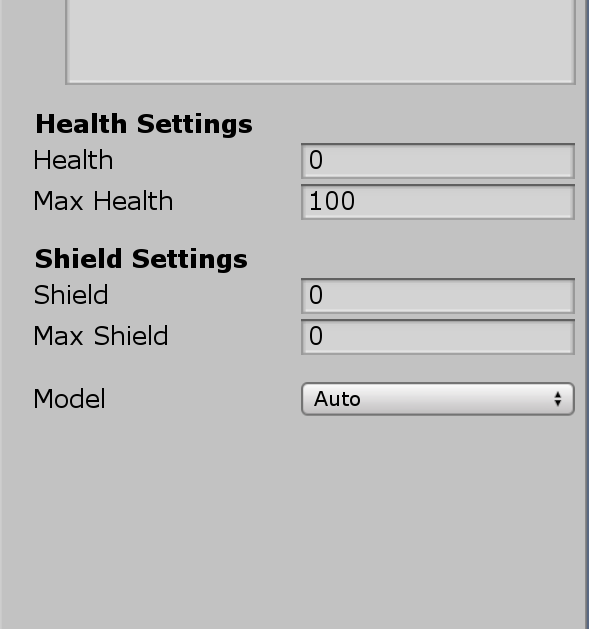
To improve Inspector windows of scripts I summarized and created screenshots for several useful fields. A more advanced list of things can be found here: https://champview.wordpress.com/2014/12/12/a-summary-of-unity-attributes/ The whole script looks like this when watched in the inspector
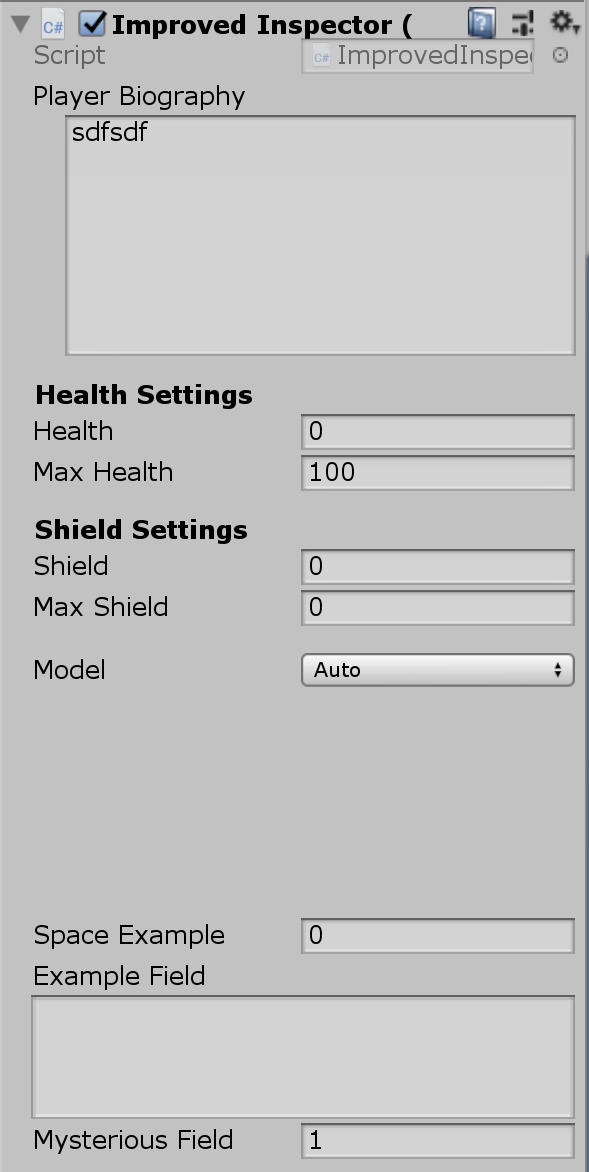
public class ImprovedInspector : MonoBehaviour
{
	//[ContextMenuItem("Reset", "ResetBiography")]
	[Multiline(8)]
	[SerializeField] private string playerBiography = "";
	/*
	[ContextMenu("This script is intended to help you style your scripts")]
	private void ContextMenu()
	{
		Debug.Log("Do Something");
	}
	*/
	[Header("Health Settings")]
	[SerializeField] private int health = 0;
	[SerializeField] private int maxHealth = 100;

	[Header("Shield Settings")]
	[SerializeField] private int shield = 0;
	[SerializeField] private int maxShield = 0;

	[HideInInspector]
	public int changeAbleFromOutside = 1; // this will not show up in the inspector

	[Space(10)]
	[SerializeField] private ModelImporterIndexFormat model;
	private enum ModelImporterIndexFormat
	{
		Auto = 0,
		[InspectorName("16 bits")]
		UInt16 = 1,
		[InspectorName("32 bits")]
		UInt32 = 2,
	}

	[Space(100)]
	[SerializeField] private int spaceExample = 0;
	[TextArea(4, 8)] // or just [TextArea]
	[SerializeField] private string exampleField;
	[Tooltip("The field does nothing, really")]
	[SerializeField] private int mysteriousField = 1;
}
Serialize Field
With Serialize Field you can display private properties in the inspector. This means you can make classes which are well encapsulated from a programming point of view but still be customizeable from the Editor.
https://docs.unity3d.com/ScriptReference/SerializeField.html
[SerializeField] private int health = 0;
Header Fields

Header fields are nice to group fields.
https://docs.unity3d.com/ScriptReference/HeaderAttribute.html
[Header("Health Settings")]
[SerializeField] private int health = 0;
[SerializeField] private int maxHealth = 100;
[Header("Shield Settings")]
[SerializeField] private int shield = 0;
[SerializeField] private int maxShield = 0;
Hide Attributes
This is very nice if you need to have public attributes which should not show up in the Inspector. The normal approach would be to go with private by default and mark viewable fields with Serializefield. https://docs.unity3d.com/ScriptReference/HideInInspector.html
[HideInInspector]
public int changeAbleFromOutside = 1; // this will not show up in the inspector
Inspector Name
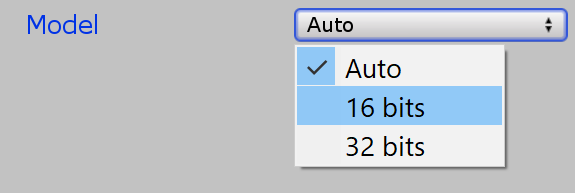
If you want custom names for the enumerations in your inspector this is a good way to do it.
https://docs.unity3d.com/ScriptReference/InspectorNameAttribute.html
[SerializeField] private ModelImporterIndexFormat model;
private enum ModelImporterIndexFormat
{
	Auto = 0,
	[InspectorName("16 bits")]
	UInt16 = 1,
	[InspectorName("32 bits")]
	UInt32 = 2,
}
Space
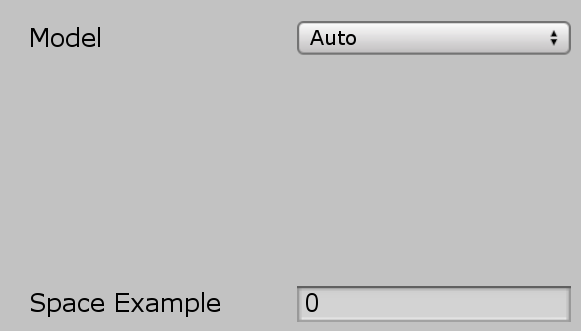
The Space attribute allows to add visual space in between inspector elements.
https://docs.unity3d.com/ScriptReference/SpaceAttribute.html
[Space(100)]
[SerializeField] private int spaceExample = 0;
Text Area

TextAreas are helpful if you want to put in a lot of text and still be able to see it. Optional you can define what the minimal lines are (here 4) and how many lines it should display before adding a scrollbar (here 8). https://docs.unity3d.com/ScriptReference/TextAreaAttribute.html
[TextArea(4, 8)] // or just [TextArea]
[SerializeField] private string exampleField;
Tooltip

Tooltips are a great way to explain what these attributes really do. Activated by hover over it.
https://docs.unity3d.com/ScriptReference/TooltipAttribute.html
[Tooltip("The field does nothing, really")]
[SerializeField] private int mysteriousField = 1;
The colors and the watercolor look really makes the game unique. The style goes so well with the soundtrack. The style and music carries the story forward and helps to cope with the sad nature of the game. The emotions are well transported without the need for extensive dialogs, which I was positively surprised by. I can recommend the Wanderer as a beautiful experience.
The game can be bought on steam: https://store.steampowered.com/app/966670/The_Wanderer_Frankensteins_Creature/
And as always you can find all screenshots in my Steam library: https://steamcommunity.com/id/Thecell/screenshots/?appid=966670&sort=oldestfirst&browsefilter=myfiles&view=imagewall
It’s a fun story but I felt the backstory to the main character hindered me at identifying with the character. I had mostly one option to respond how I felt but the game tried to push his old character quite a bit. All in all it was a nice story in an interesting world. Not as emotionally loaded as I expected it to be after the walking dead though.
The game can be bought on steam: https://store.steampowered.com/app/250320/The_Wolf_Among_Us/
All Images can be found in my Steam image wall: https://steamcommunity.com/id/Thecell/screenshots/?appid=250320&sort=oldestfirst&browsefilter=myfiles&view=imagewall
Archives
- November 2023
- December 2022
- November 2022
- February 2022
- November 2021
- October 2021
- September 2021
- July 2021
- April 2021
- March 2021
- February 2021
- January 2021
- September 2020
- July 2020
- April 2020
- March 2020
- February 2020
- December 2019
- November 2019
- October 2019
- August 2019
- June 2019
- February 2019
- December 2018
- November 2018
- October 2018
- September 2018
- August 2018
- July 2018
- May 2018
- March 2018
- February 2018
- December 2017
- November 2017
- September 2017
- July 2017
- June 2017
- April 2017
- February 2017
- January 2017
- October 2016
- September 2016
- July 2016
- May 2016
- April 2016
- March 2016
- August 2015
- July 2015
- May 2015
- April 2015
- March 2015
- February 2015
- January 2015
- October 2014
- April 2014
- March 2014
- February 2014


